
This is detailed guide for upgrading Owncloud 9.0x to Owncloud 9.1 in Synology NAS devices running DSM 6. Owncloud 9.1 has been just recently published, and I wanted to share my procedure for updating Owncloud. This process should be fine for minor, point or major version upgrades of Owncloud also going forward, unless big changes are introduced how Owncloud is operating.
Before starting to go through the steps, I want to emphasize that every system is different, and there may be aspects that you need to do and consider that I am not covering here. But hopefully I am able to provide enough information for you to understand the steps needed to consider on your side. So please do understand that this is not by any means a definitive guide for your upgrade process. But as I have received many questions in many contexts about the update and how to use the occ comands in command line in Synology NAS – I decided to share my process to you. My process might seem too thorough and detailed, but I personally like to be cautious in upgrading production systems.
Also please consider reading thoroughly the Owncloud 9 documentation section about updating Owncloud. As there are multiple options for doing the upgrade, mainly these:
- Package upgrade
- This is not an option for Synology, as there are no packages we could use in synocommunity.
- Updater app upgrade
- In practice we have here the same steps as in Manual upgrade, the difference is that the app is trying to automate the steps needed.
- Manual upgrade
- This is my favorite, and my choice for updating Owncloud instance. You are in control of every step of the process.
The following pieces of text are from Owncloud 9 documentation to highlight the importance:
It is best to keep your ownCloud server upgraded regularly, and to install all point releases and major releases without skipping any of them, as skipping releases increases the risk of errors. Major releases are 8.0, 8.1, 8.2, and 9.0. Point releases are intermediate releases for each major release. For example, 8.0.9 and 8.1.3 are point releases. Skipping major releases is not supported.
Upgrading is disruptive. Your ownCloud server will be put into maintenance mode, so your users will be locked out until the upgrade is completed. Large installations may take several hours to complete the upgrade.
You should always maintain regular backups and make a fresh backup before every upgrade.
Then review third-party apps, if you have any, for compatibility with the new ownCloud release. Any apps that are not developed by ownCloud show a 3rd party designation. Install unsupported apps at your own risk. Then, before the upgrade, all 3rd party apps must be disabled. After the upgrade is complete you may re-enable them.
Upgrade Quickguide
- Disable all third-party apps.
- Make a fresh backup.
- Upgrade your ownCloud (core files).
- Run occ upgrade (optionally disabling the migration test).
- Apply strong permissions to your ownCloud directories.
- Take your ownCloud server out of maintenance mode.
- Re-enable third-party apps.
Ok – let’s start the upgrade process. You can follow to whole guide exactly as I do it, or pick up parts and pieces as you see fit for your own process.
1)
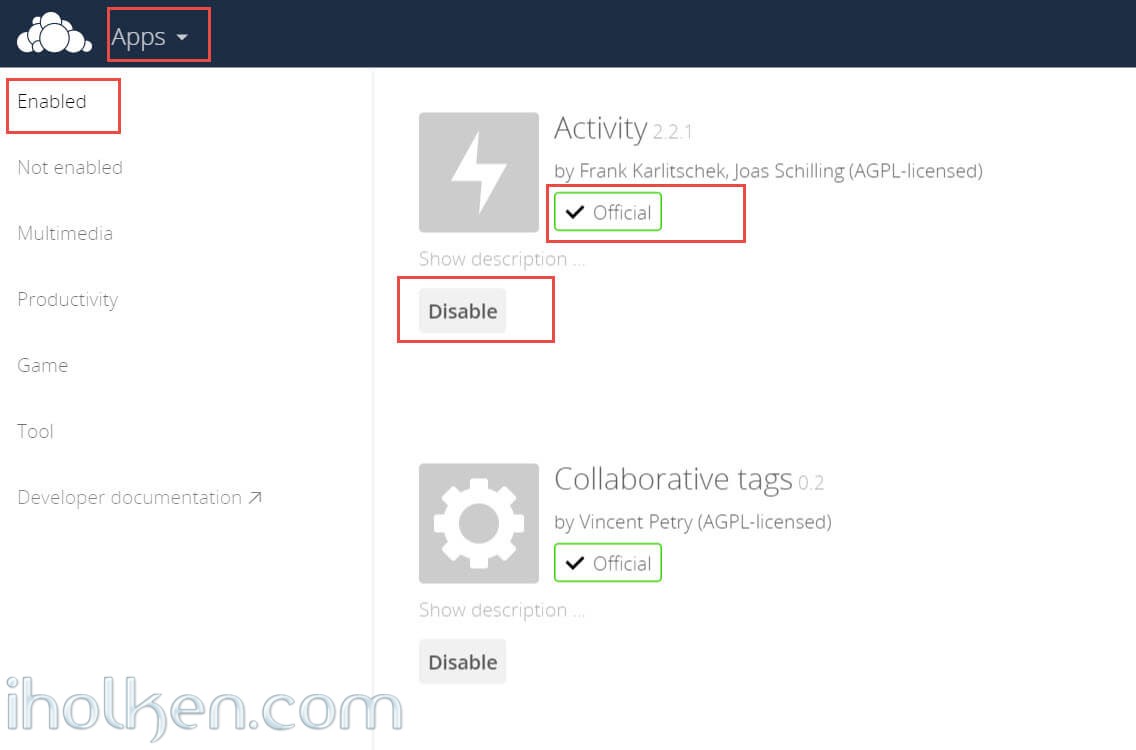
Login into your Owncloud instance as administrator, and disable all non-official 3rd party apps you might have installed and enabled. Non-official apps do not have the tag ‘Official’.
2)
List down for later purposes all the directories/paths where you have something you need or want to preserve in the upgrade.
Here is my listing:
1 2 3 4 5 |
/volume1/web/owncloud/core/skeleton /volume1/web/owncloud/apps/ /volume1/web/owncloud/config/ /volume1/web/owncloud/themes/ /volume1/owncloud/ |
I have included above paths, because I have:
- custom skeleton files for new users
- custom 3rd party apps
- config.php
- custom theme
- Owncloud data folder
You also need to think are there any other modifications that you have made, that you possibly need to re-do after upgrade. I know that I have modified the owncloud .htaccess file for doing the permanent re-direction from http to https. So I will record that to my to-do list as well. After your first upgrade you should have all this listing ready, and this will not be a big hassle at that point anymore. You should also keep this list up-to-date, in case you do some other direct changes to Owncloud core files.
3)
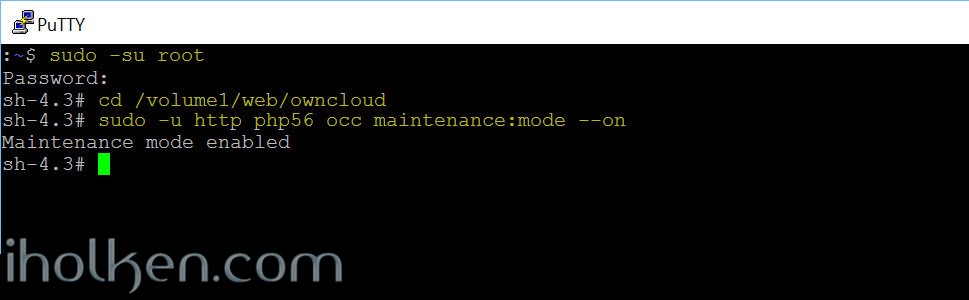
Put your Owncloud instance into maintenance mode. This prevents new logins, locks the sessions of logged-in users, and displays a status screen so users know what is happening. There are two ways to do this, and the preferred method is to use the occ command, which you must run as your HTTP user. Here is how you run that in Synology DSM:
1 2 3 |
sudo -su root cd /volume1/web/owncloud sudo -u http php56 occ maintenance:mode --on |
(Note: In Synology DSM we actually need to use ‘php56’ instead of ‘php’ in the occ console commands for Owncloud.)
This is what your users should see once maintenance mode is enabled.

4)
Let’s modify the Owncloud web folder permissions, to ensure that we don’t ran into issues during our upgrade process. I won’t do any modifications to Owncloud data folder, as no changes are required there. This is valid only if you have setup your data folder outside Owncloud web folder (and you followed my guide for installing Owncloud 9 to your Synology NAS).
1 2 3 |
chown -R http:http /volume1/web/owncloud/ find /volume1/web/owncloud/ -type f -print0 | xargs -0 chmod 0777 find /volume1/web/owncloud/ -type d -print0 | xargs -0 chmod 0777 |
![]()
5)
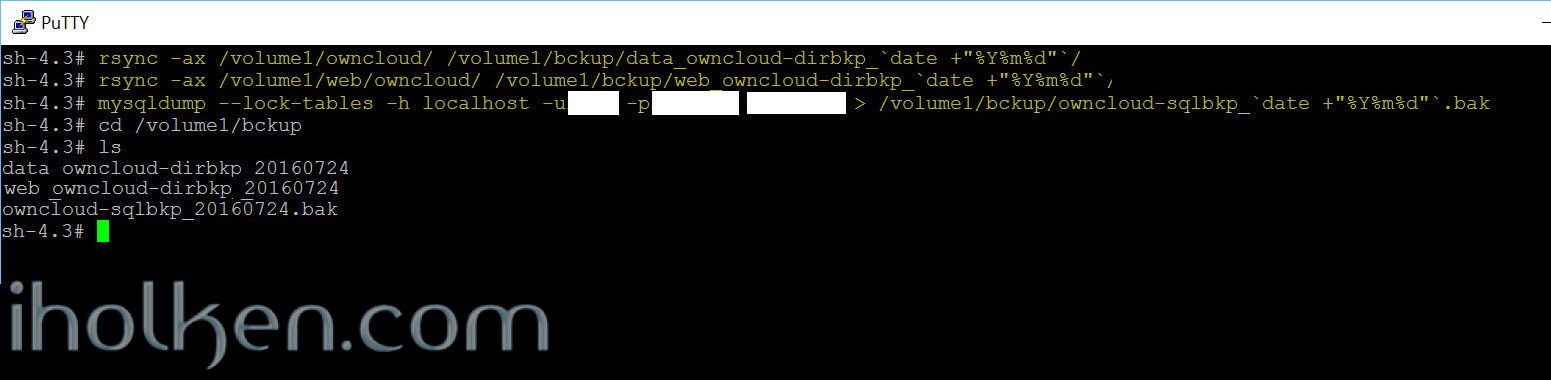
Let’s take the fresh backups of the whole Owncloud instance currently in use.
Please modify paths and db names accordingly for your setup. I have in my example following paths:
- Owncloud install folder: /volume1/web/owncloud/
- Owncloud data folder: /volume1/owncloud/
- Backup files location folder: /volume1/bckup
Owncloud core files and Owncloud Data files:
1 2 |
rsync -ax /volume1/owncloud/ /volume1/bckup/data_owncloud-dirbkp_`date +"%Y%m%d"`/ rsync -ax /volume1/web/owncloud/ /volume1/bckup/web_owncloud-dirbkp_`date +"%Y%m%d"`/ |
This will replicate you Owncloud web and data folder into backup folder appended with date.
Owncloud Database:
1 |
mysqldump --lock-tables -h localhost -u[dbadmin] -p[password] [owncloud database name] > /volume1/bckup/owncloud-sqlbkp_`date +"%Y%m%d"`.bak |
Replace [ ] parts with your ‘dbadmin username‘, ‘password‘ and ‘owncloud database name‘. This will dump your Owncloud database into -bak file appended with date.
Now you have backed up your whole Owncloud installation to your backup folder. See below screenshot for example execution and what files were generated into the backup folder:
6)
Now shut down your web server in Synology:
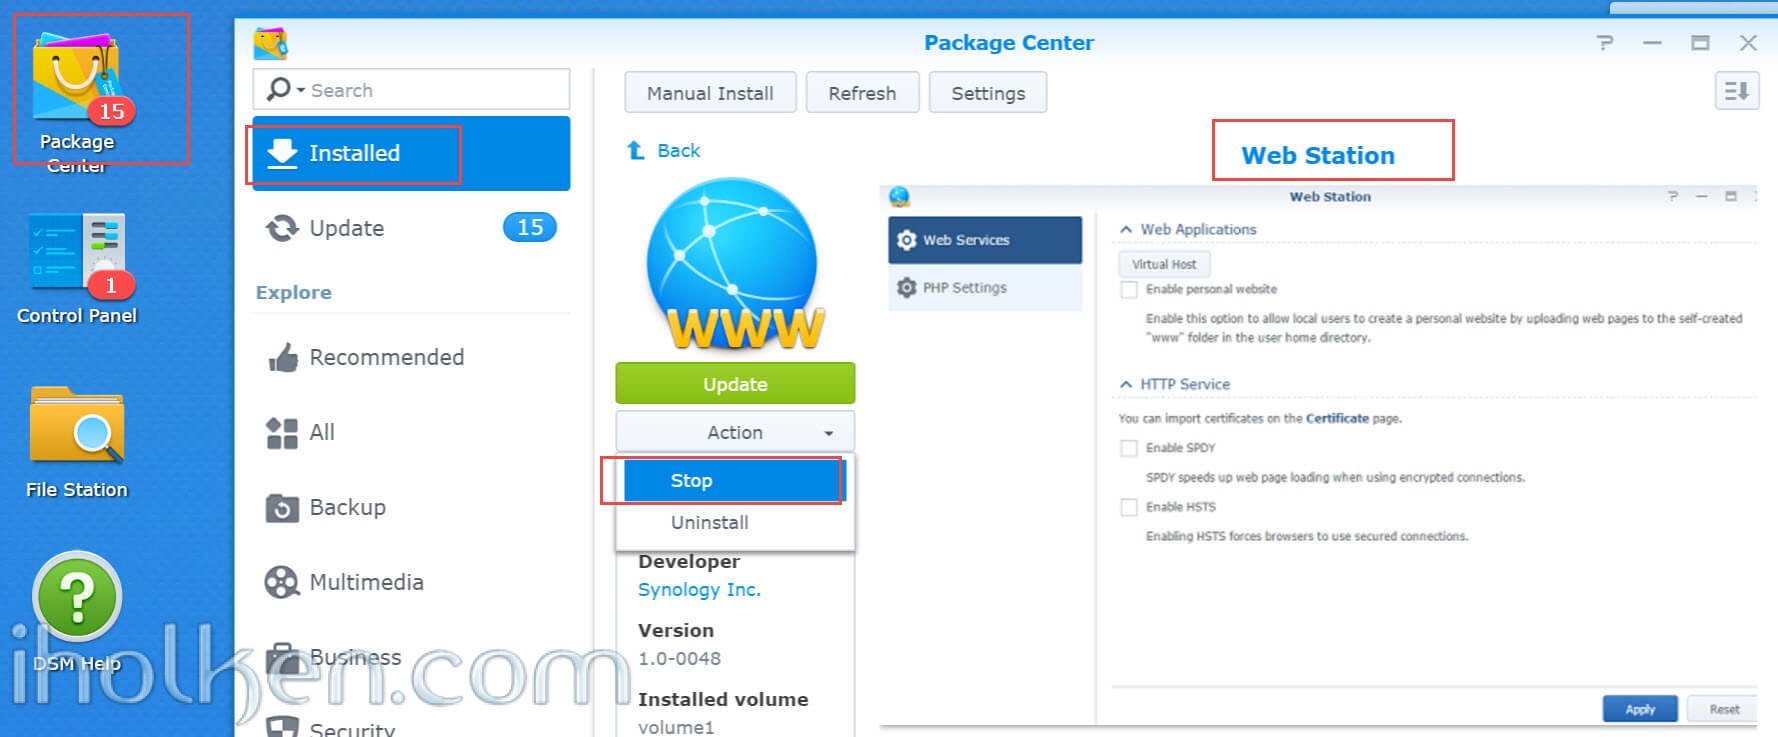
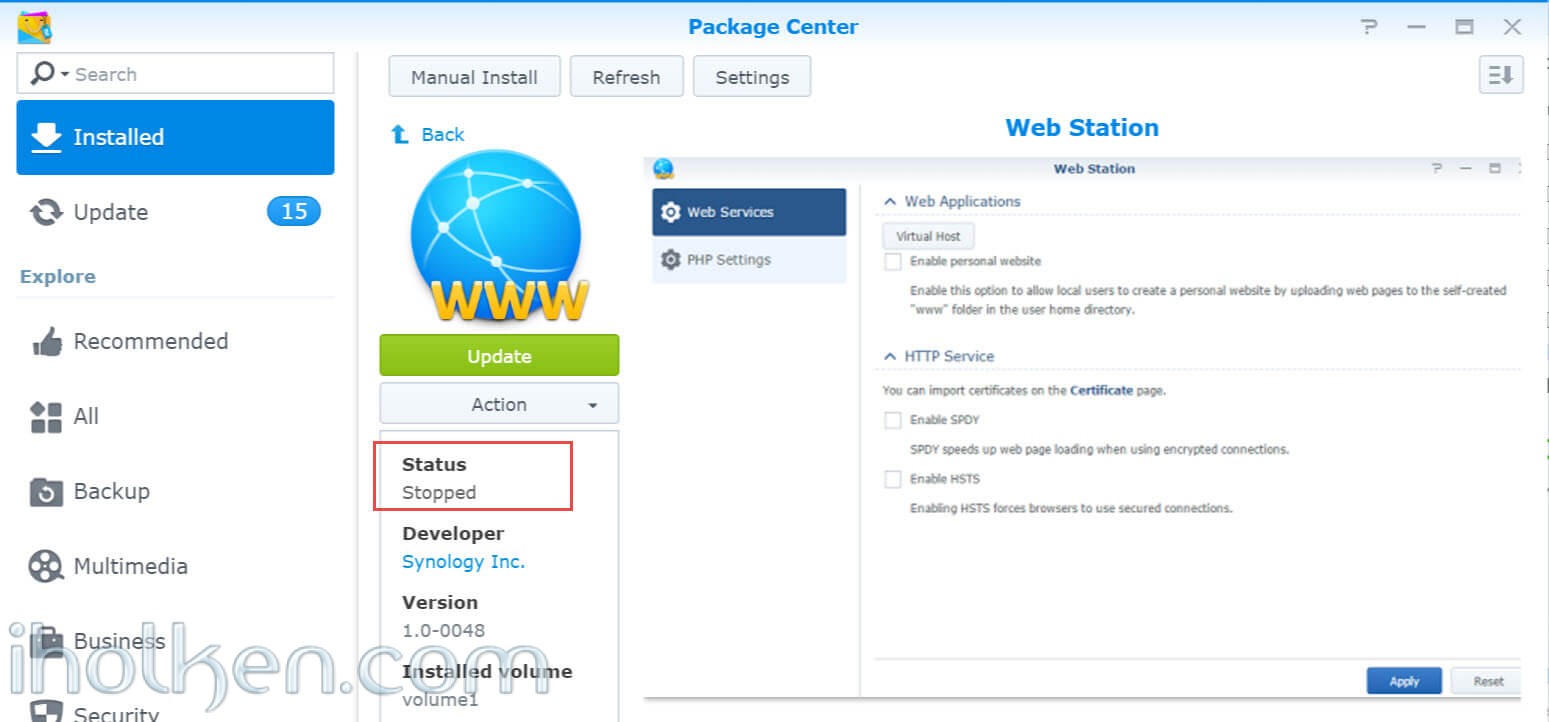
7)
Now we can proceed on upgrading the Owncloud core files structure.
First we need to rename the existing Owncloud web folder to something else.
1 |
mv /volume1/web/owncloud /volume1/web/old_owncloud |
Then we proceed on loading the latest Owncloud version from Owncloud downloads as the new Owncloud web folder:
1 2 3 4 |
wget --no-check-certificate https://download.owncloud.org/community/owncloud-9.1.0.tar.bz2 -O /tmp/owncloud-9.1.0.tar.bz2 cd /tmp tar jxf owncloud-9.1.0.tar.bz2 |
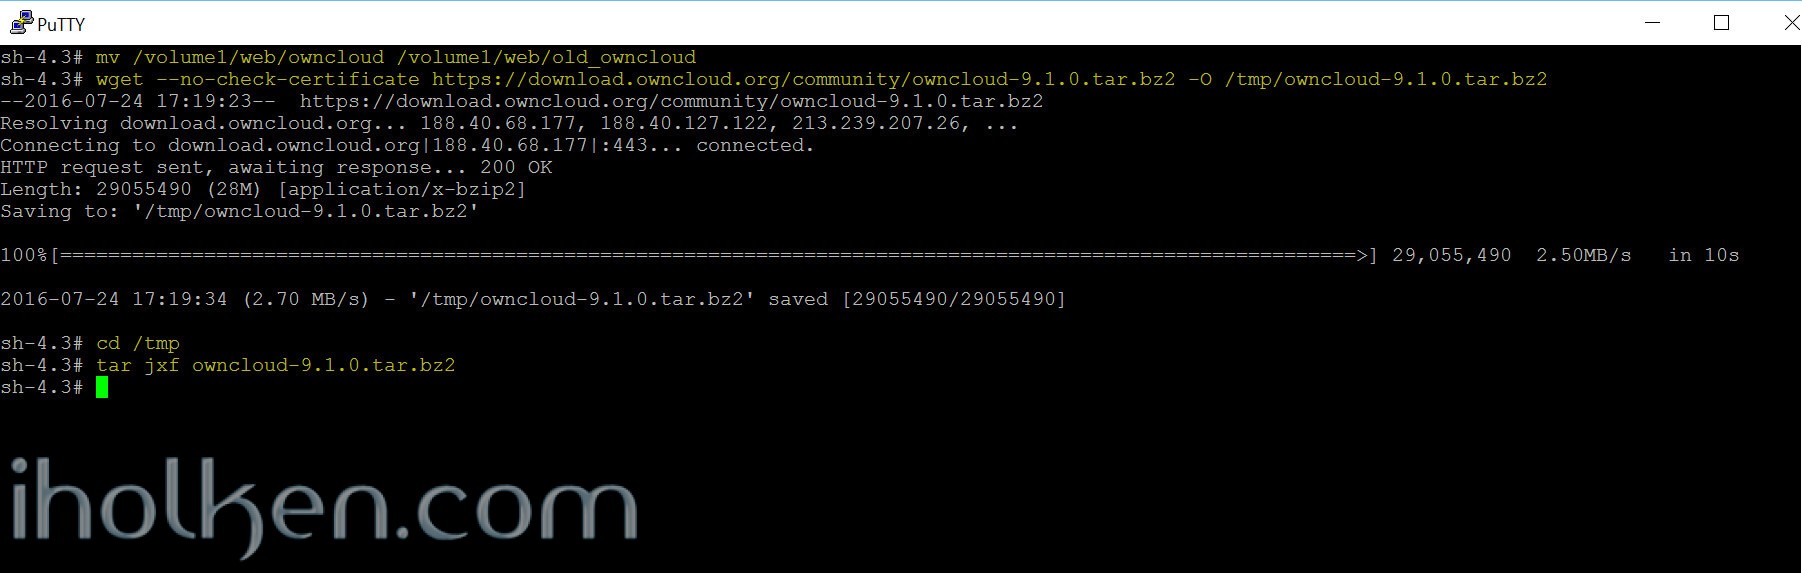
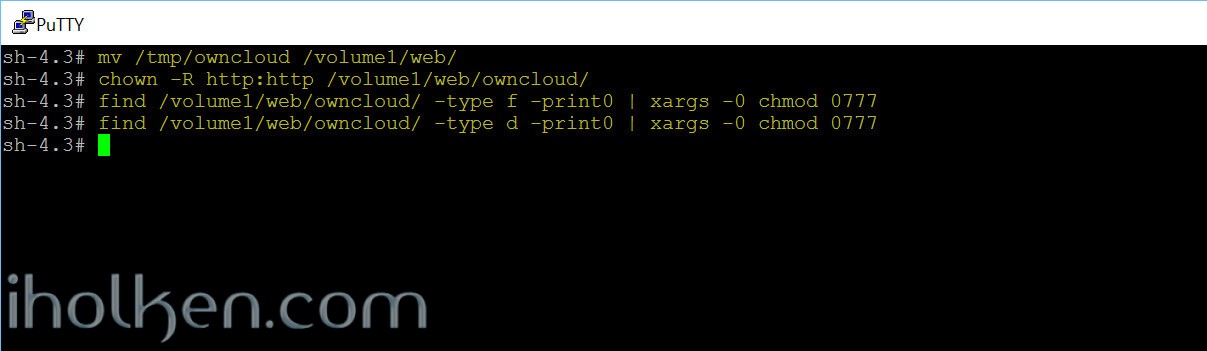
Now you have loaded the version 9.1 and extracted the needed [Owncloud] folder into ‘/tmp’ folder. Next step is to move that folder into /volume1/web:
1 |
mv /tmp/owncloud /volume1/web/ |
Now after copy, we need to again ensure that correct permissions are assigned to the ‘/volume1/web/owncloud’ folder:
1 2 3 |
chown -R http:http /volume1/web/owncloud/ find /volume1/web/owncloud/ -type f -print0 | xargs -0 chmod 0777 find /volume1/web/owncloud/ -type d -print0 | xargs -0 chmod 0777 |
8)
Now is the time to copy those preserved files from the old Owncloud directory back to the new updated Owncloud directory:
Based on my preserved file listing, this is how I do it:
1 2 3 4 5 6 7 8 |
rm -R /volume1/web/owncloud/core/skeleton cp -avr /volume1/web/old_owncloud/core/skeleton /volume1/web/owncloud/core/ rm /volume1/web/owncloud/config/config.php cp -av /volume1/web/old_owncloud/config/config.php /volume1/web/owncloud/config/config.php rm -R /volume1/web/owncloud/themes/ cp -avr /volume1/web/old_owncloud/themes /volume1/web/owncloud/ |
In similar manner you need to bring any special 3rd party apps you might have installed, from the old apps folder to the new apps folder.
At this point you also need to make the additional modifications (if any) you have made to the original Owncloud core files, like .htaccess or similar.
9)
Now after all above steps – you should have done all the preparations. Let’s re-start the Synology Web Service:
10)
Now we need to start the upgrade process from command line with following commands:
1 2 |
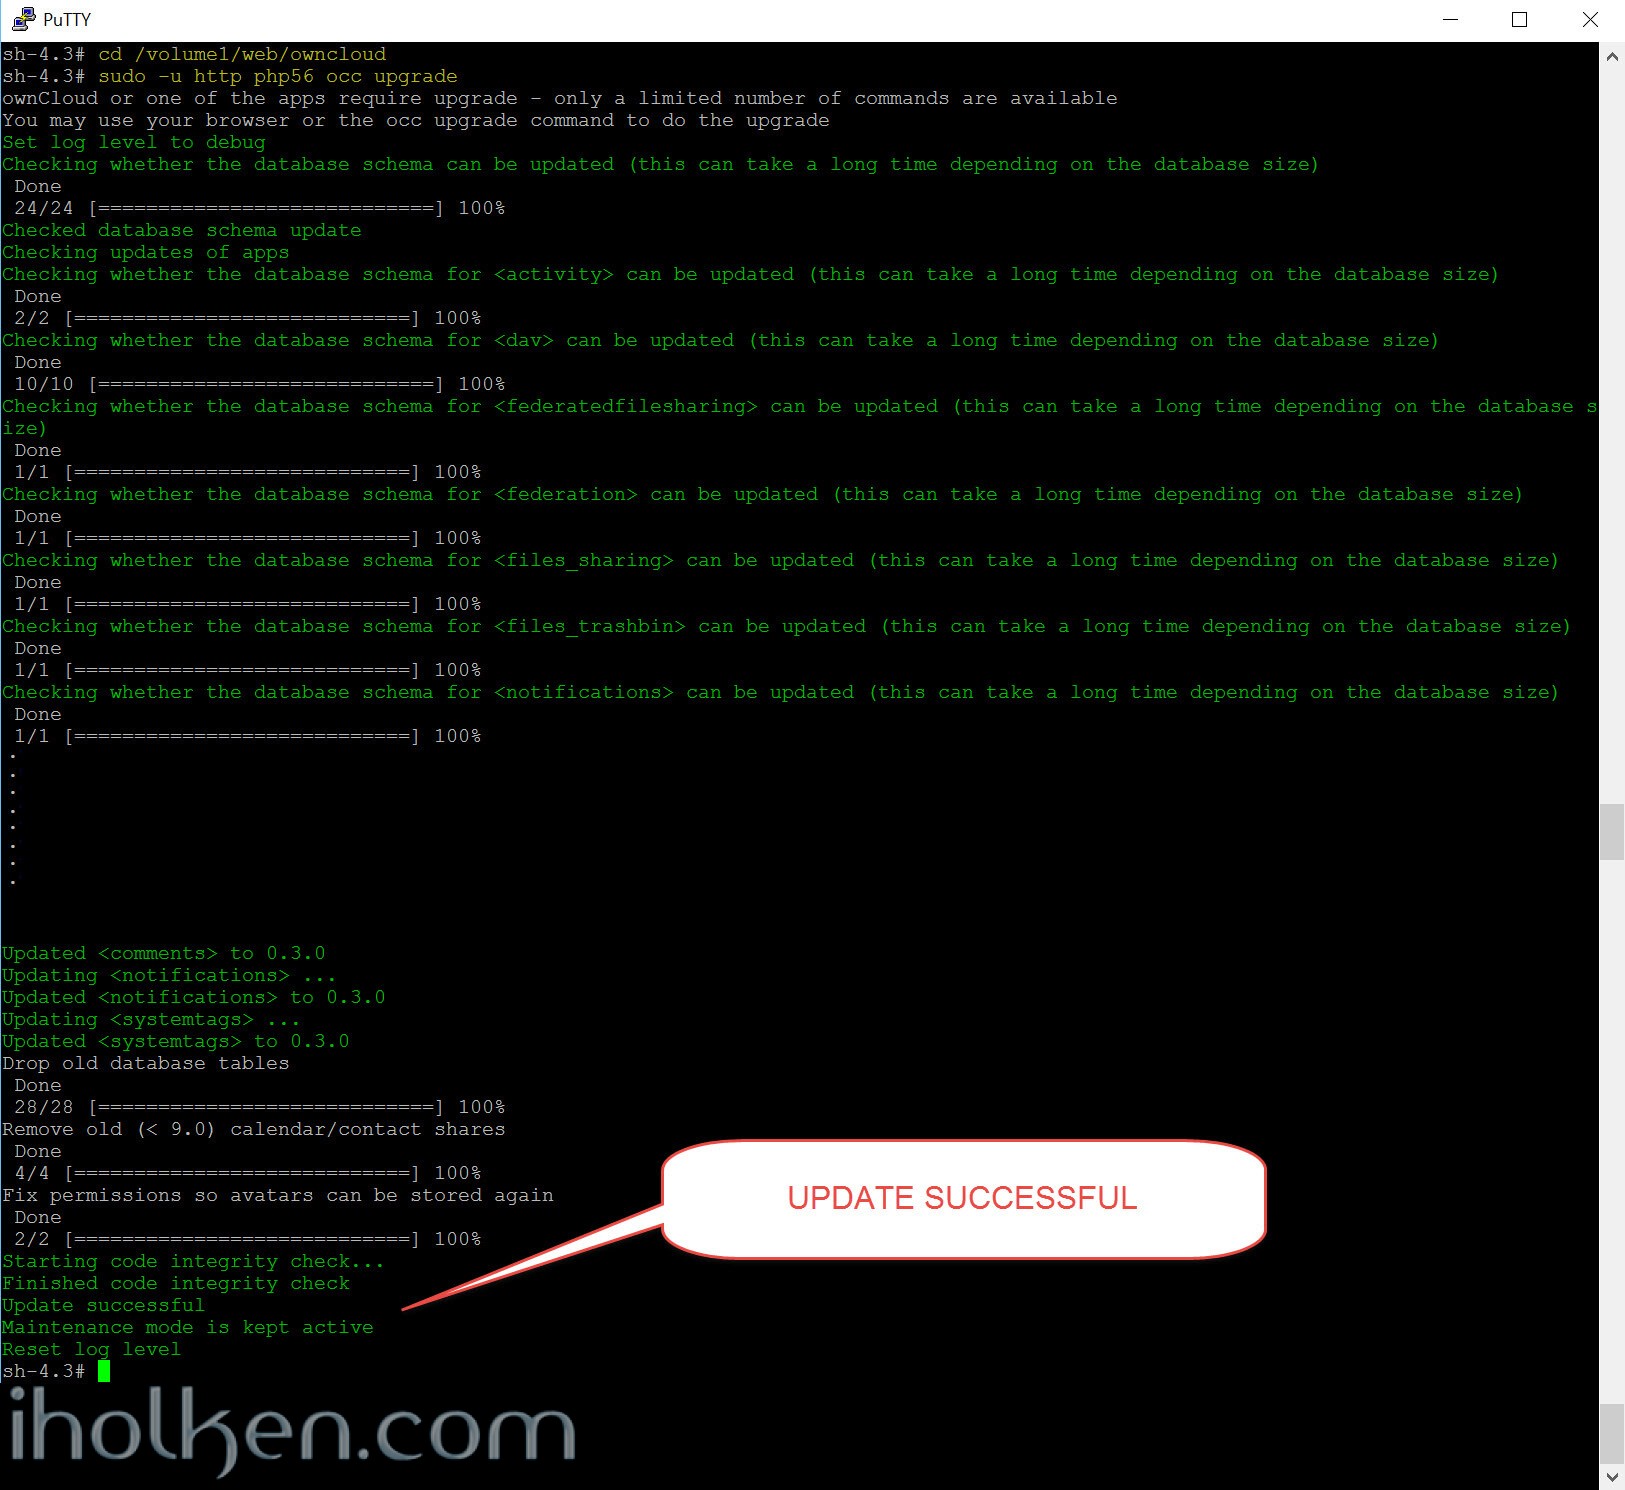
cd /volume1/web/owncloud sudo -u http php56 occ upgrade |
The upgrade operation takes a few minutes to a few hours, depending on the size of your installation. When it is finished you will see a success message, or an error message that will tell where it went wrong.
11)
If everything went smoothly, we can disable maintenance mode:
1 2 |
cd /volume1/web/owncloud sudo -u http php56 occ maintenance:mode --off |
12)
I usually always right after the upgrade process, I run manually the occ command to scan all user files:
1 2 |
cd /volume1/web/owncloud sudo -u http php56 console.php files:scan --all |
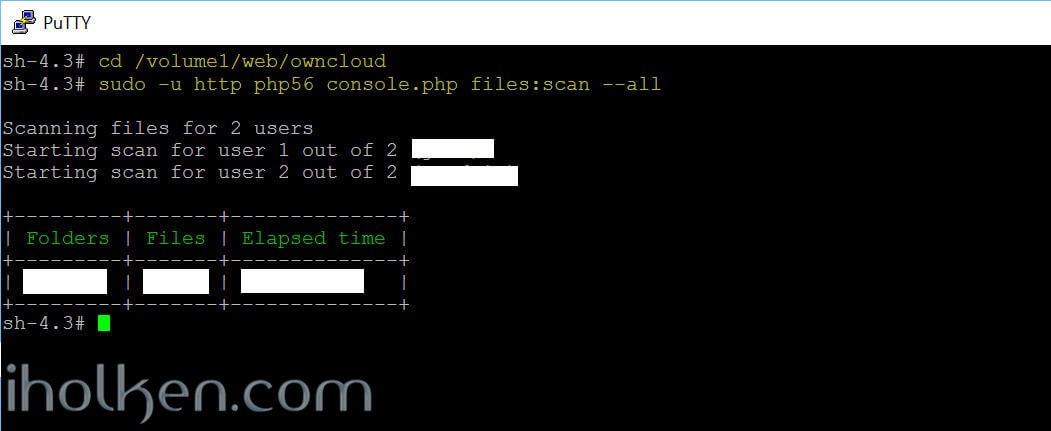
Now you can login for the first time to the upgraded Owncloud portal.
13)
Enjoy the 9.1 renewed default login screen background:

14)
After login the Owncloud web interface should open.

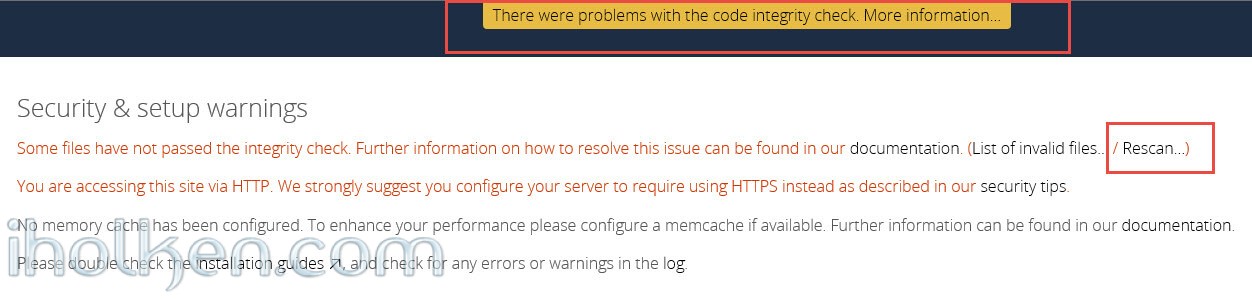
If you see the error “There were problems with the code integrity check” – this is most likely because Synology creates @eadir cache folders everywhere. Removing these manually from Owncloud folders will remove the error. In this job you might find this code useful:
1 |
find . -name "@eaDir" -type d -print0 | xargs -0 rm -rf |
And here is example on how to use it:
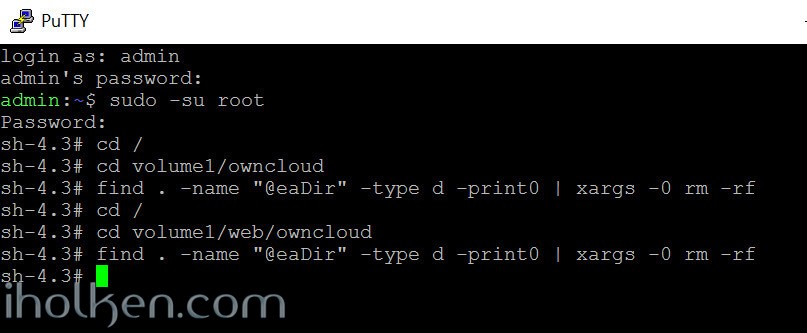
And you have now removed all ‘@eaDir’ folders from owncloud folders. And you should also be able to remove the error by Selecting ‘RESCAN’ on admin page of Owncloud.
15)
Enable and test functionality for any 3rd party apps you possible had installed.
16)
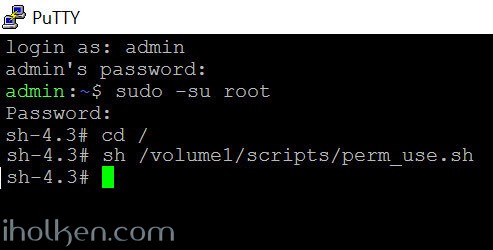
If everything seems to work correct and files seem okay – it is time to assign more strict permissions back:
Please regard the given script as example only – always validate security permissions for your needs as required – and review related documentation from Owncloud.org for version 9.
I use a script (.sh) file, with following contents:
1 2 3 4 5 6 7 8 9 10 11 12 13 14 15 16 17 18 |
#!/bin/bash chown -R root:http /volume1/web/owncloud/ chown -R http:http /volume1/web/owncloud/apps/ chown -R http:http /volume1/web/owncloud/config/ chown -R http:http /volume1/web/owncloud/themes/ chown root:http /volume1/web/owncloud/.htaccess chown root:http /volume1/owncloud/.htaccess find /volume1/web/owncloud/ -type f -print0 | xargs -0 chmod 0640 find /volume1/owncloud/ -type f -print0 | xargs -0 chmod 0640 find /volume1/web/owncloud/ -type d -print0 | xargs -0 chmod 0750 find /volume1/owncloud/ -type d -print0 | xargs -0 chmod 0750 chmod 0644 /volume1/web/owncloud/.htaccess chmod 0644 /volume1/owncloud/.htaccess |
And I’m running it in SSH terminal like this (run it as root as it “can be done in DSM 6″ and from root folder in SSH terminal):
Congratulations – you should have now successfully upgraded your Owncloud version!
Note: The renamed copy of the old Owncloud version should be removed away from web folder / assigned extremely strict permissions right after upgrade, and once you are confident the new updated Owncloud is working – you could delete the whole instance. After all, you still have the full & fresh back-up stored.
If this worked for you – please let me know by leaving a post / feedback below!
Thanks – and take care!

Juha Ketola


Awesome – worked like a charm – very good.
I found two minor things in your guide:
Step 7
=> in the code exampls remove the $
Step10
=> execute cd /volume1/web/owncloud first (as we are still in the /tmp on the console) or move it from step 11 to step 10
Hi Alex,
Thanks for taking the first run, and thanks for the comments. I’ve updated based on your comments. Good points – thanks.
Now we have 2 succesful updates made with this guide. Hopefully it will help others in their upgrade journeys!
Take care!
Br,
Juha
Work Fine!
Thanks
Hi!
Great to hear – thanks for the confirmation!
/Juha
Hi,
maybe
chown http:http /volume1/web/owncloud/.user.ini
for the max upload size needs to be set again as well after upgrade, right?
Cheers
Hi,
Actually fully depending on how the user wants to configure the upload limits. It’s really up to the user….
I’ve just brought up the thing if user wants to configure it through admin UI in Owncloud.
/Juha
Hmh…if I change the upload size after all permissions have been applied again the .user.ini is written correctle but I get this error:
Can’t write upload limit to /volume1/web/owncloud/.htaccess. Please check the file permissions
If I do this:
chmod 0644 /volume1/web/owncloud/.htaccess
It works!
So what do you think, should the write-right for http set for this file permanently? What about the .htaccess in the /volume/owncloud?
Cheers
Alex
Hi Alex,
The permissions are always something that user should really focus and use some time to get the optimal setup for his/her case. That is why I have used here the recommendation from Owncloud documentation for setting Strong Directory Permissions – and not really dug deeper on that area.
/Juha
Hi Juha,
first of all: thanks for your amazing tutorials! I successfully installed ownCloud 9 and upgraded to 9.1 with your guide.
But coming now to my problem: I upgraded yesterday to v9.1.3. Unfortunately, my ownCloud logs show reoccurring PHP errors: “PHP Startup: No such handler: DBA_DEFAULT at Unknown#0”. I did not find anything about that anywhere else.
Most interesting: Everything runs fine. All clients sync smoothly, the web interface runs correctly, … Do you have an idea where this error comes from? I could think of a problem with PHP communicating with MariaDB, but actually everything works fine.
Cheers,
Matthias
Hi Juha & Matthias
Great tutorial that helps a lot for installing and upgrading Owncloud on the Synology NAS.
A BIG THANK YOU FOR THAT!
I do get now the same message as Matthias. I saw somewhere that it occured when different PHP versions are installed and the wrong one is called about. But I do actually only have one installed…
Any help?
KR
scherom
I am getting the following error.
What is not correct ?
sh-4.3# sudo -u http php56 occ upgrade
ownCloud is not installed – only a limited number of commands are available
[Symfony\Component\Console\Exception\CommandNotFoundException]
Command “upgrade” is not defined.
Thanks
Sascha
Hi,
Strange, If you follow the process exactly, it should/will work.
Please doublecheck your file/folder permissions, then check that you copied the fies correctly.
Perhaps reboot might also help If your system IS behaving strangely.
I hope this helps. Take care.
Used this excellent tutorial once again to upgrade to ownCloud 10.0.0 (from 9.1.4).
If anybody will face an internal server error after _successfully_ upgrading ownCloud, read this:
https://central.owncloud.org/t/owncloud-htaccess-breaks-installation/7404
There is a mistake in the .htaccess template… Maybe its a simple incompatibility with Synology’s software combination. But anyway – it’s working now!
Took me nearly half an hour to find that information!
Hope it helps someone. 🙂
OK, just did an upgrade to 10.0.15 a few minutes ago as it was released yesterday – the .htaccess problem did not occur again! Seems to be fixed for “other common server / php combinations” 😉
Hi Matthias!!
Great stuff, thanks for the link and your confirmation! I’m sure it will help someone in between updates!!
Thanks for the posts!!!
Take care!!
Thanks a million Juha! Your tutorials helped me greatly installing and upgrading Owncloud on my Synology DS411. I’m running 10.0.4 now. Uploading is not very fast but I think that’s because of the limited capacity: the single 1.6 GHz cpu is working at almost a 100% when uploading a lot of files. I tried to install Redis, that didn’t work but I guess it’s overkill anyhow on such a limited machine.
regards,
Marc
I upgraded my OC once again using this documentation. This time from 9.1.2 to 10.0.9 – All worked as a charm.
Some small remarks:
1. Themes are handled different in OC X, so there is no themes folder anymore. Themes are done via the marketplace now
=> This means this line is obsolete: chown -R http:http /volume1/web/owncloud/themes/
2. Third party apps like calendar and contacts should be disabled before an upgrade, for lazy people like me you can also do this on the command line:
sudo -u http /usr/local/bin/php56 occ app:disable calendar
sudo -u http /usr/local/bin/php56 occ app:disable contacts
Note: After upgrading from 9 to 10 you have to add calendar and contacts from the marketplace again. Probably there is also a command line for this, but just enable doesnt work.
…and again thank you for your great work!