
In this post I will go through shortly the installation of trusted 3rd party SSL/TLS certificate into your Synology NAS device, and how to enable that for Synology web services (websites/Owncloud). I will also show how to make HTTP -> HTTPS redirect in Owncloud 9 and DSM 6, Apache 2.2 setup. I will not cover the generation of trusted 3rd party certificate itself, internet is full of certificate providers and instructions for that work.
Synology NAS has by default one self-signed certificate (and you can create more of those if you will), that is by default in use for default web enabled services (WebDav, Cloud Station, FTPS etc.) that Synology has. It is not provided by Trusted 3rd party CA – but may be enough for some purposes within people and network you know.
Further on – it is for you to decide, if you want to deploy your new certificate for all Synology web enabled services (set is as default), or if you deploy it only for some virtual hosts or all of them. This has direct relationship what kind of certificate you will acquire as well. Are you going for getting a wildcard certificate, that will cover many sub-sites in your domain on one go – or if you want to have separate certificates for different hosts in your domain.
So when starting this – you should have your private key (.key) and certificate files (.crt) received from Trusted 3rd party Certification Authority (CA).
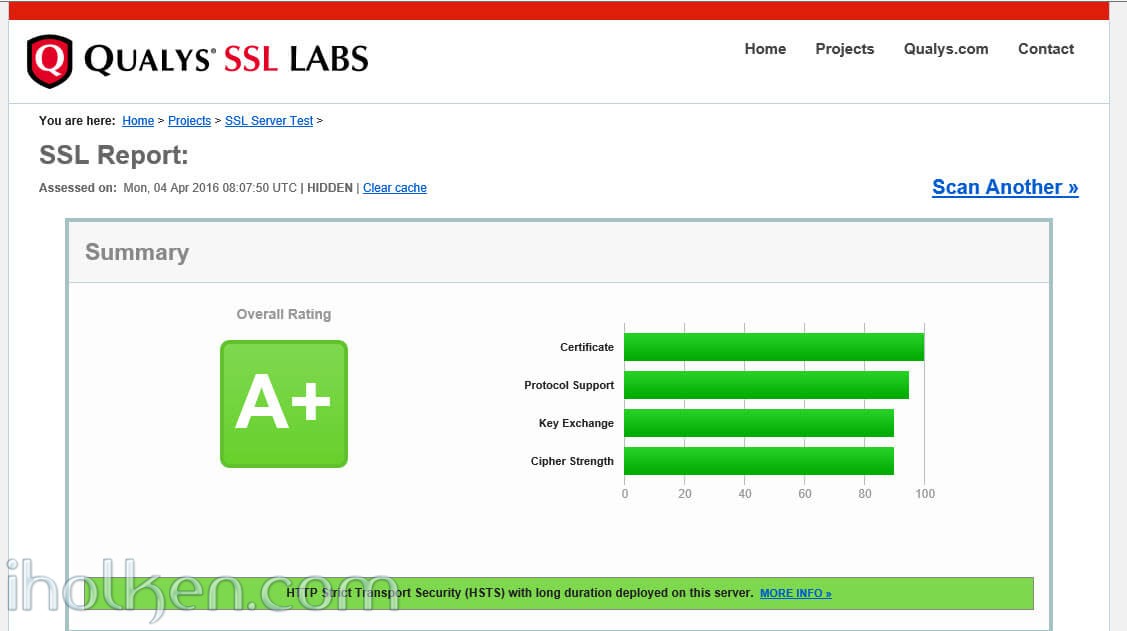
My example setup passes with A+ grade the Qualys SSL Labs test.
1)
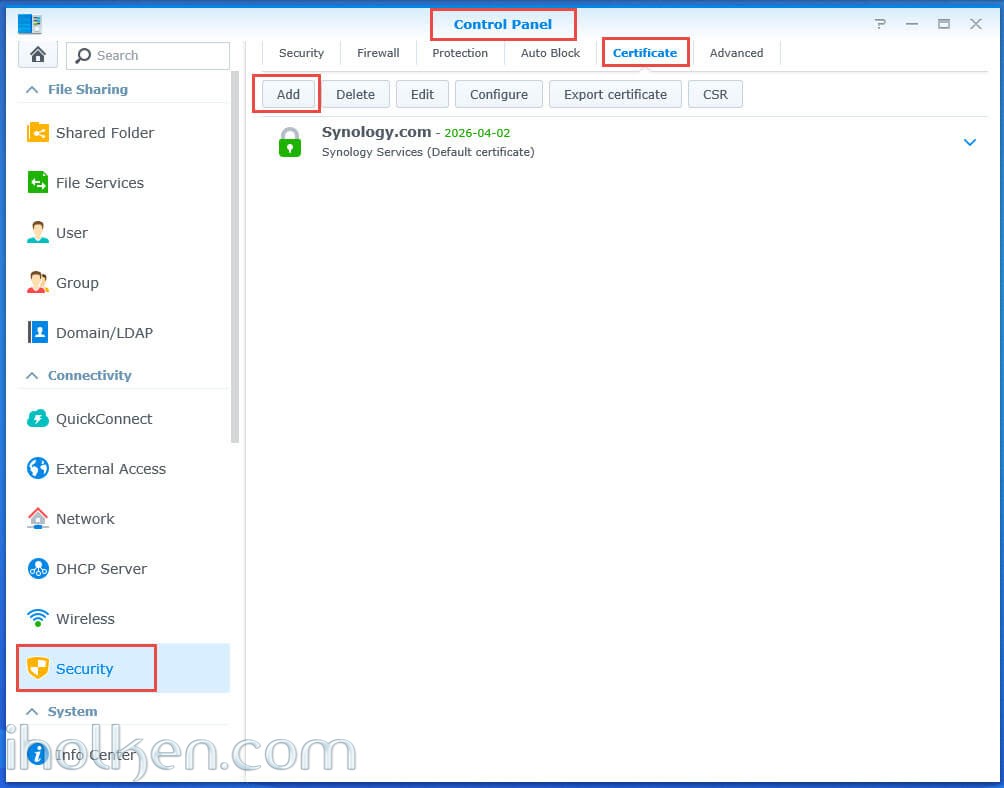
Start by importing the certificate files into your Synology NAS:
Control Panel -> Security -> Certificate -> Add
Choose Add or Replace certificate based on your requirements:
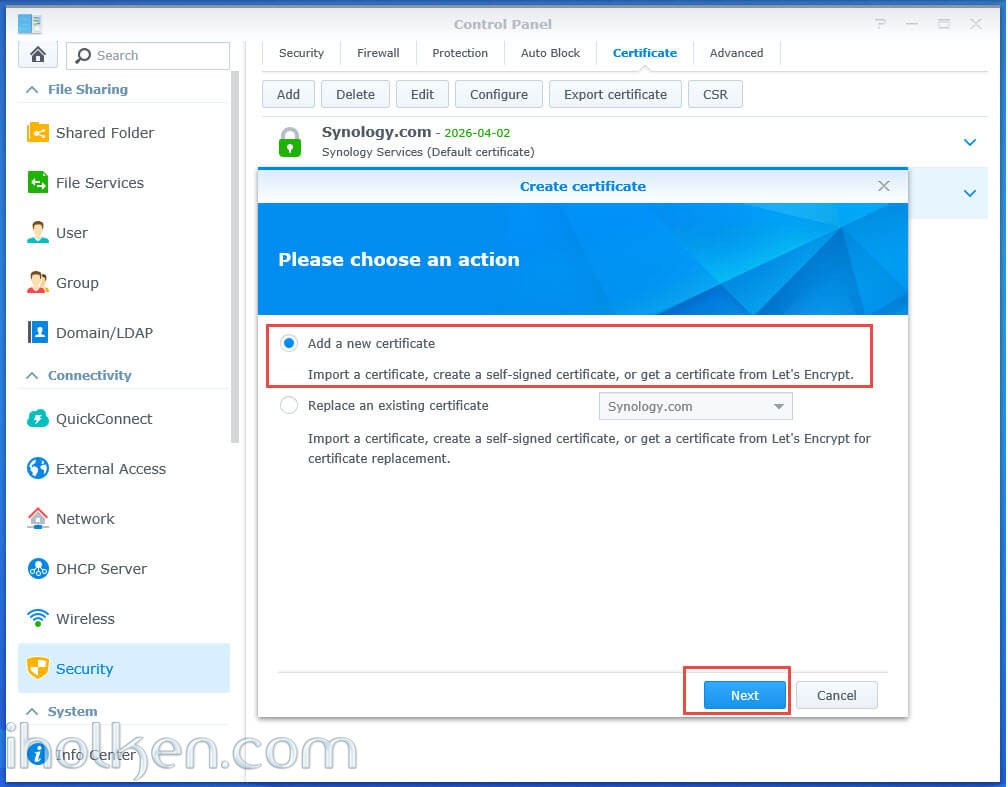
Give descriptive name and choose ‘Import certificate’ option:

(Note: In above screen you have also the option to set the imported certificate as default certificate, for all other Synology Web Services. You can also configure this later in certificate settings, IF you want to configure it. Just remember that if you want to enable HTTPS for all Synology Services, you need to also add the option in DSM Admin UI –> Control Panel –> Network –> DSM Settings –> “Automatically redirect HTTP connections to HTTPS (Web station and Photo station excluded”. But before doing that, I strongly suggest that you first check that your certificates are working as expected, so that you won’t ran into issues accessing your Synology.)
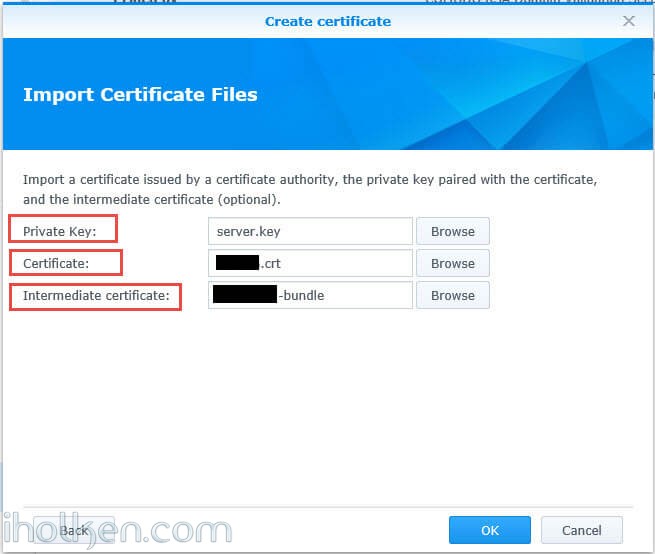
Browse to your key file and certificate file, and in addition the intermediate certificate file – if you have downloaded that and want to complete the chain:
Click ok – and if your certificates and keys are properly generated –> you have successfully imported your certificates into Synology NAS.

Using the ‘Configure’ option you can select which web services or web sites should use which certificate. The selection is a bit hidden on the right side of the row – but it is there and if you click it it will appear. Little note from the author of this post – If the domain in your new certificate is matching your website published into your Synology NAS, perhaps you should link at least those. 🙂

After the above HTTPS certificate configuration – you can do your HTTP -> HTTPS re-direct – if that is what you want (!). It may be, that you want to keep some traffic in HTTP and some in HTTPS, so in that case you should not make this re-direction.
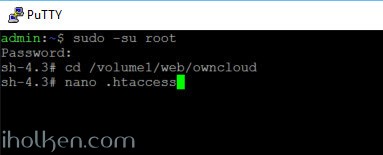
For this HTTP -> HTTPS re-direct example I will take an Owncloud 9 installation. Here the configuration of the HTTP -> HTTPS re-direct requires modification into your .htaccess file located in Owncloud webroot folder.
This is the .htaccess file location:
And the change is required to be made in the section above the line *** DO NOT CHANGE ANYTHING ABOVE THIS LINE*** notification, in the mod_rewrite.c module:
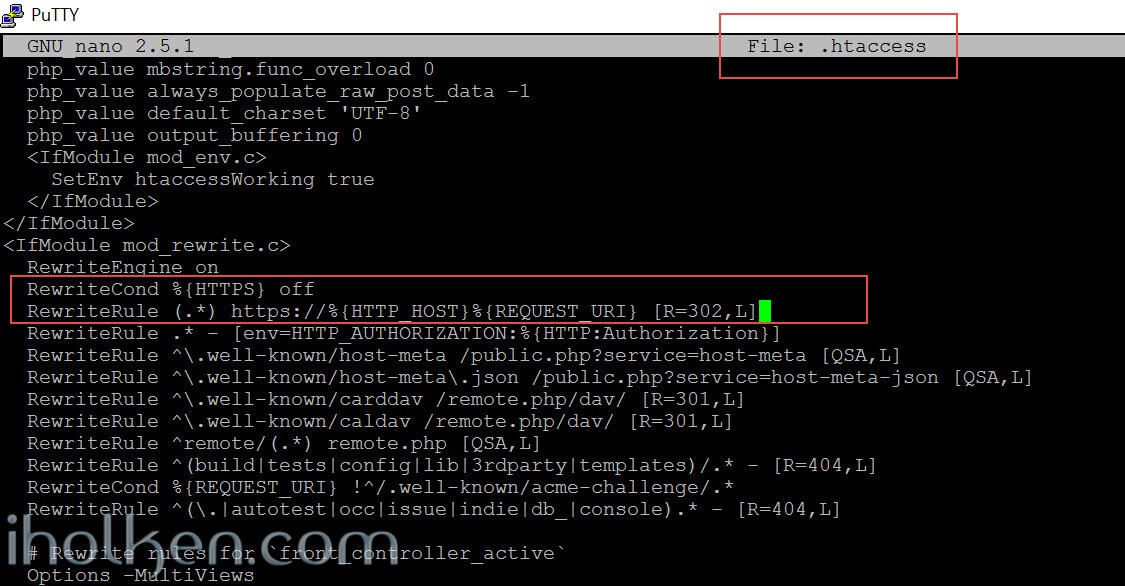
And the code addition in text as well:
1 2 |
RewriteCond %{HTTPS} off
RewriteRule (.*) https://%{HTTP_HOST}%{REQUEST_URI} [R=302,L]
|
(Note: Using R=302 as temporary, because we need to first test that the rules are working, only after testing change it to permanent R=301)
I did not find any other working method then modifying the .htaccess and adding above lines. I hope this will not affect any other functionalities of Owncloud, as we are making the re-direct in the section that we perhaps should not be modifying according to Owncloud devs note in the .htaccess file…. In case some of you readers out there have an alternative way of achieving this same functionality in Synology NAS for Owncloud 9 – I would be interested in the solution and happy to add it here to the tutorial as well.
(Just as a note, I’m not thrilled on modifying the vhosts file in Synology, because it is completely overwritten everytime you make changes in Synology admin interface to the virtual hosts. This is the reason I wanted to do this in the .htaccess file.)
Now you have imported your certificates and configured your HTTP -> HTTPS re-direct, now would be the time to test the functionality of your HTTPS, Owncloud and also re-direct configuration with different browsers and user scenarios.
Some guidelines for .htaccess rewrite rules testing:
- Clear browser history / cache between tests
- Use browser incognito mode
- Try to eliminate any elements that might affect the testing results outside the web server functionality itself
- If you have only production, consider using fake user-agent for testing, and in your .htaccess make condition to apply the re-write rules only for that specific user-agent
Once you are confident that everything is working with HTTP and HTTPS as expected, you can further modify the re-write rule to use R=301 which translates to permanent redirection for browsers:
1 2 |
RewriteCond %{HTTPS} off
RewriteRule (.*) https://%{HTTP_HOST}%{REQUEST_URI} [R=301,L]
|
(Note: testing rules with R=301 is generally bad practice, it is permanent by nature and aggressively cached by browsers. In case you have some issues while doing testing ‘in production’ all other customers may experience persistent issues with accessing your site.)
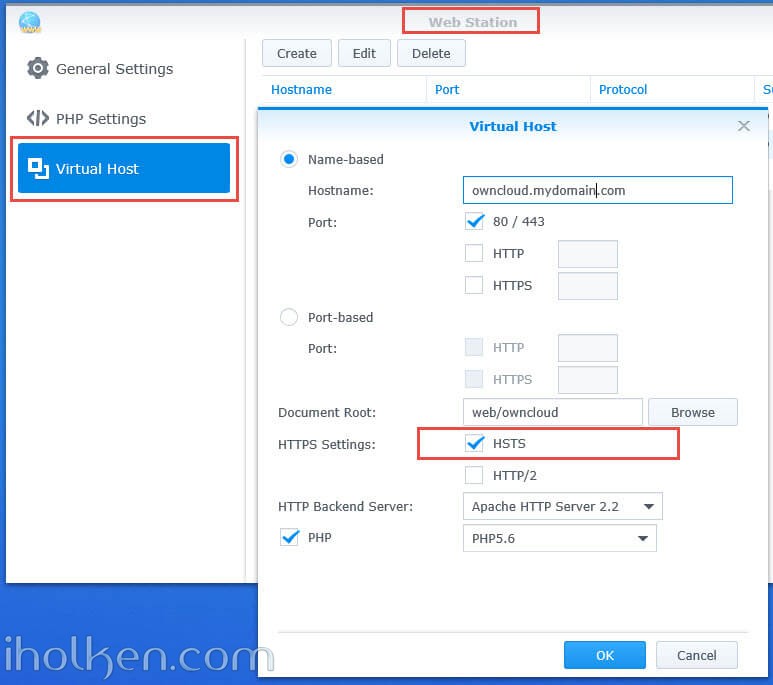
After configuring the re-direct rules as desired – you can further configure the HTTP Strict Transport Security (HSTS) condition in your virtual hosts.
Enabling HSTS in the Virtual Host settings in practice means that if browser once has connected using HTTPS secure connection to a certain host – browser will only use HTTPS to connect to the host going forward. This is why you should test the HTTP -> HTTPS re-direct configuration before setting this on, as if you once manually try the HTTPS when HSTS is enabled – it is already the browser that is making the re-direct to HTTPS. 🙂
This configuration is stored inside the user browser – and it is valid for 6 months time (For some browsers clearing cache or deleting cookies will remove the secure flag for the host, however there are some disturbing messages that for some browsers (like Safari) the removal process might be even more complicated).
However – IF you decide to configure HSTS (which is recommended by Owncloud community), please ensure that your HTTPS configuration will always work and remember to keep your certificates up-to-date and available in hardware upgrades or similar activities. Otherwise you will get unnecessary user errors when user’s browsers will force HTTPS but your site is not able to serve it. This would severely impact the user experience of your site.
Here is where you configure HSTS for your Virtual hosts:
After this setup you should have successfully configured HTTPS for your Synology NAS web services and web sites, including HTTP -> HTTPS redirect and HSTS for your website or Owncloud installation if applicable. Same re-direct can be applied other web hosts than Owncloud, in the .htaccess file.
(Note: As you can host multiple virtual hosts and multiple SSL certificates on your Synology NAS, it is rather obvious that SNI (Server Name Indication) is used in order to make all this work and your web requests will find correct certificates and matching websites. So in other words, if you use secure configuration for your web services in your Synology NAS, your setup will support only SNI capable browsers. In general the SNI support is on a good level – so I wouldn’t worry this too much. It is just good to realize that some really old setups/browsers may not be able to access your HTTPS site in Synology, especially if you direct all web traffic to HTTPS.)
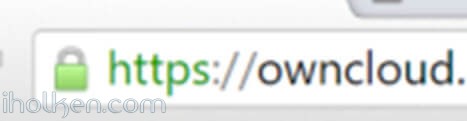
This will also pass nicely the Qualys SSL Labs test:
I hope this will help you in setting up HTTPS for your Synology hosted services, and also clarify some of the settings for securing your Synology NAS hosted service or site.
thanks!
—-
Update 05.04.2016: If you have secured your Owncloud installation and enabled HTTP -> HTTPS re-direct, and you are calling Owncloud cron.php with Synology Task Scheduler, you might have to update your Task Scheduler script accordingly based on your needs and certificates installed for curl. If it is running on the same server, and you have an issue with certificates – you could configure the user-defined script execution to ignore certificate check:
1 |
curl --insecure https://localhost/owncloud/cron.php |

Juha Ketola


Thanks again Juha for this awesome write-up!
I ended up choosing HTTP to HTTPS redirect in Control Panel -> Network – > DSM Settings because it was the easiest way and because I wish all traffic to be HTTPS.
I just finished blogging about my setup and wanted to let you know, and then I saw this brilliant and fully detailed post. I appreciate the effort!
/ Jesper
Hi Jesper,
Have you tested with a clean browser and HSTS disabled that the re-direct really is working correctly in all cases?
I remembered that the web station and photo station were actually excluded from that HTTP -> HTTPS re-direct done in DSM Admin interface. But if you have tested it with clean test setup and clean browsers –> and it is working, then I just have to take your word on it! 🙂
/Juha
Hi Juha,
You are absolutely correct. This is the only method for HTTP -> HTTPS re-direct with the Synology/Owncloud setup. The DSM Admin inteface excludes Web station and Photo station. Thanks for the detailed post!
Thanks Reggie for this confirmation on your side! 🙂
I already started wondering was I really the only one experiencing this…
Hi and thanks for your tutorials!
Hope this topic is still monitored 😉
I keep getting the same error and I can’t seem to figure it out. OwnCloud says: “The “Strict-Transport-Security” HTTP header is not configured to at least “15552000” seconds.”
Do you know how I can fix this on my Synology (DSM 6.2)?
Thanks!
Hi!
Still monitoring. 🙂
Have you checked these instructions in documentation? Not helping?
https://doc.owncloud.org/server/9.1/admin_manual/configuration_server/harden_server.html#enable-hsts-label