
This guide will have detailed instructions for enabling and configuring Fail2ban service for Synology NAS device (DSM 6) and hosted web services like Owncloud or WordPress.
If you don’t know what is Fail2ban – it is about time to HEAR about it. It is simple program that will monitor your service logs, and block any IP addresses after too many experienced failed login attempts to your services. This is MUST HAVE for those Synology NAS servers, or any servers out there, that are exposed to over-network login for accessing data or services. So always remember to implement proper logging even for your homebrew services, so that you can further utilize Fail2ban for those as well. The setup described in this post will re-start Fail2ban automatically after NAS re-start and even preserve active jails and re-initiate those after reboot.
You don’t need to enable this for native Synology services, like SSH, Mailserver, or DSM login. Those are already covered by using the ‘Auto Block’ feature under DSM security settings (I hope you have enabled those!!). So these services do not need this Fail2ban configuration, but any web services you might have published, like Owncloud, phpMyAdmin, WordPress sites, web site with .htpasswd protection or any other custom services you might have –> will really benefit from this application. For example even though WordPress has handy plug-ins for this IP blocking, I prefer stopping the attacks before webserver layer for performance reasons.
As an example in this guide, I will provide very detailed steps for configuring Owncloud to support Fail2ban in Synology. Mainly because there seems to be huge interest in installing Owncloud to Synology, and this is definitely a step to the right direction. If you have not yet installed Owncloud into your Synology NAS device, and you are wondering exactly how to do that. Please take a look at another post in my blog.
If there are many requests coming in for generating detailed configuration steps for phpMyAdmin or .htpasswd protected sites, I might look at adding those as separate blog entries in the future. But I’m confident that after reading this article, you will find that configuring Fail2ban is easier than you expected – and you will master further services yourself just fine. That is why I’m always trying to create very detailed guides and steps, so that even inexperienced users will get the hang of it.
As a summary – Fail2ban is a MUST-HAVE tool for protecting your service from any brute-force or Denial-of-Service (DoS) attacks, as the time/effort ratios will definitely turn into your favor after enabling Fail2ban service.
Following assumptions are made for this guide:
- Synocommunity is enabled into Synology as package source.
- NANO package is already installed from Synocommunity so you can edit text files through SSH
- This guide is made with Synology NAS and DSM 6 RC (release candidate)
- Synology NAS has SSH enabled and user knows how to utilize SSH terminal connection
By default in this guide we are doing all the steps SSH terminal session, using user sudo root (enabled in DSM6). So even though not mentioned in the commands separately – execute commands as root user.
At the time of creating this guide, Fail2ban stable version 0.95 is made for ipv4-addresses. Nowadays most of the traffic is still ipv4, so this will effectively block the vast majority of attackers. That been said, ipv6 is all the time coming more popular – and also the Fail2ban community is currently working on new release branch for Fail2ban (v0.10 alpha currently). I will definitely follow up that progress, and will be installing and taking into use version supporting ipv6 as soon as the maturity of the application will allow it.
But meanwhile this guide will take you through the basics of enabling Fail2ban for Synology NAS and the webservices it might have. You will gain understanding for the application and I don’t think the new branch will that much deviate configuration wise from the current version. After enabling Fail2ban, you can feel a lot safer leaving those services of yours alone out in the wild!
Let’s start with the installation.
1)
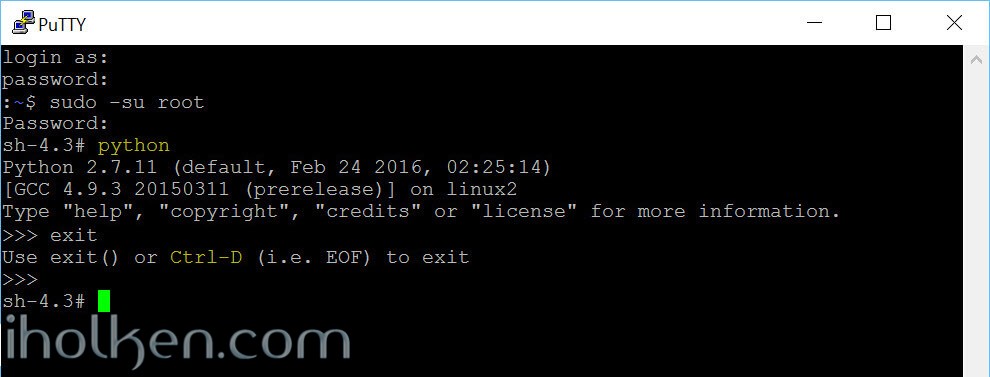
Install python 2.7 package from Synocommunity.
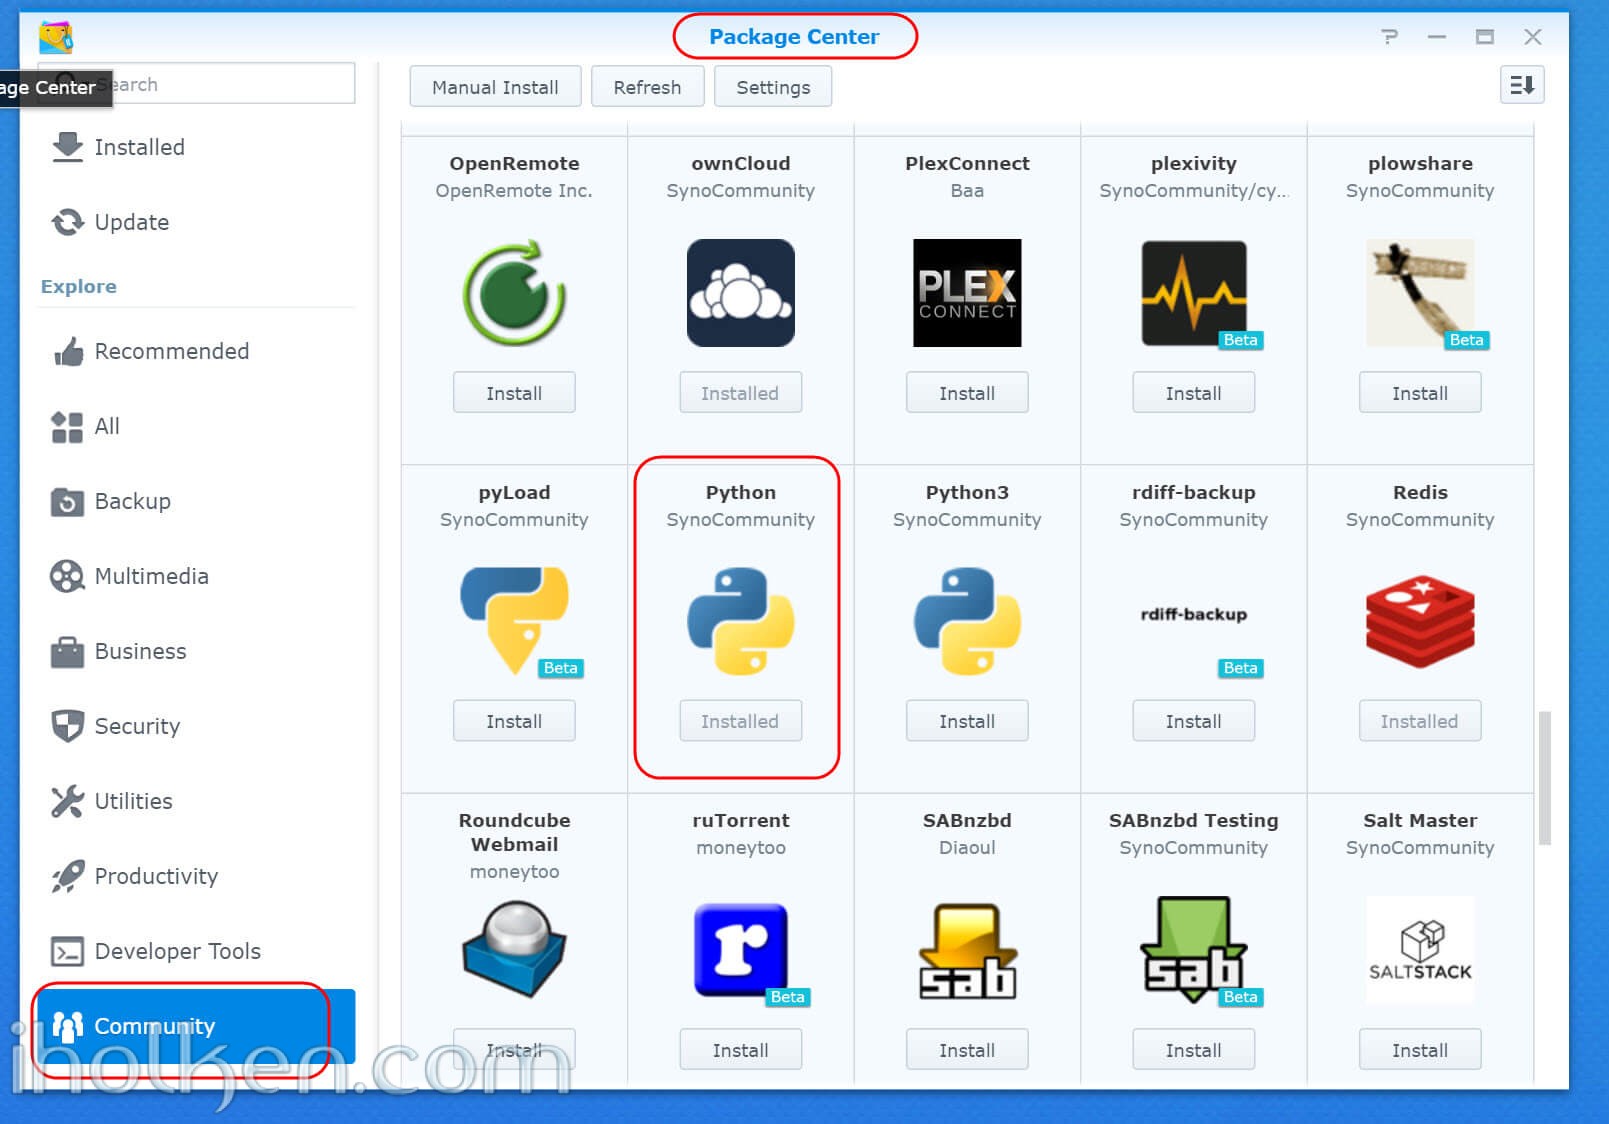
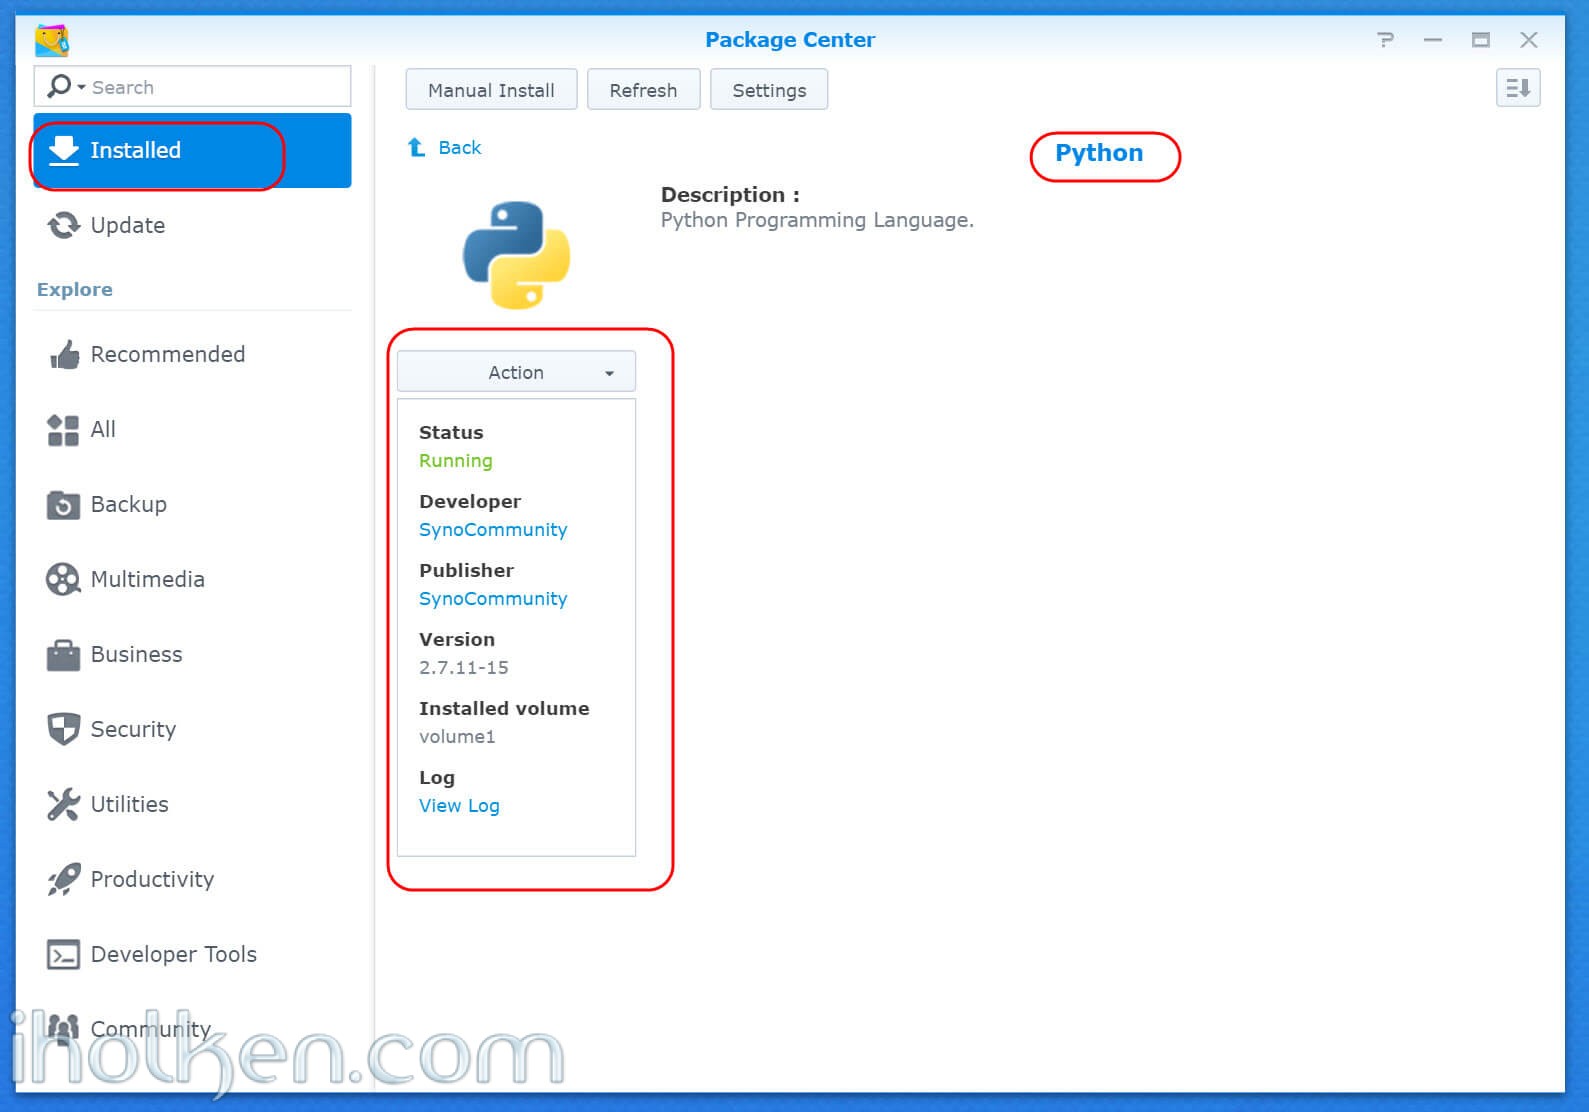
After installation check in terminal your python version and installation:
1 |
python |
2)
Install Fail2Ban
We will use wget through SSH to download the tar archive from the official fail2ban github repository into our NAS (You can do this part manually through your desktop as well – with the ZIP files, just extract contents and copy those to your NAS /tmp directory and modify the command paths accordingly if needed).
1 2 3 4 |
wget --no-check-certificate https://github.com/fail2ban/fail2ban/archive/0.9.5.tar.gz -O /tmp/fail2ban_0.9.5.tar.gz cd /tmp tar -zxvf fail2ban_0.9.5.tar.gz cd /tmp/fail2ban-0.9.5 |
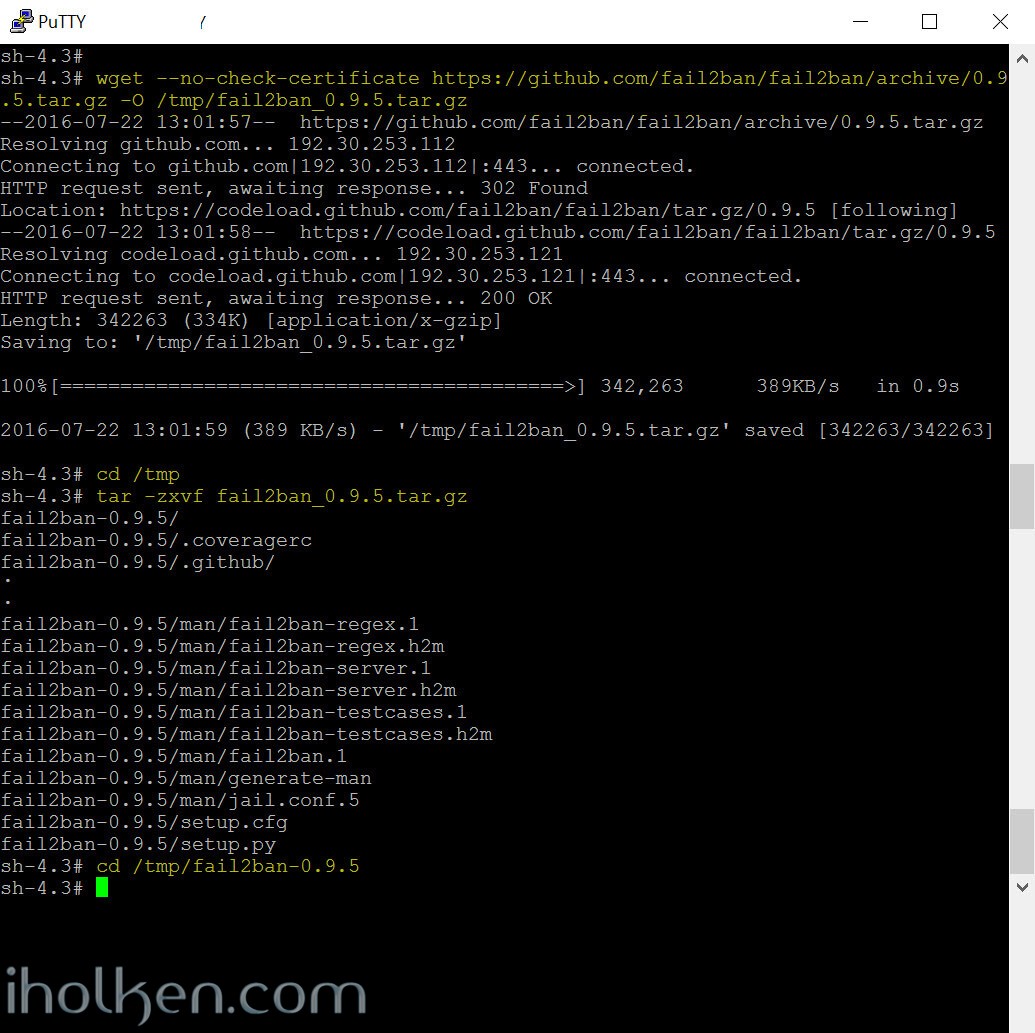
Note: I’m hosting a non-modified fork of fail2ban (including version 0.95) in my github storage in order to ensure that this guide will work as intended into the future, in case some changes are coming to the original fail2ban github structure.
Address:
https://github.com/ketolajuha/fail2ban/archive/0.9.5.tar.gz -O /tmp/fail2ban_0.9.5.tar.gz
Next Fail2ban updated version I’m planning to take into use in the future is 0.1xx series supporting also ipv6. But currently the maturity is still on alpha level and usually I don’t take into production that early phase versions..
For following up the new versions available, and looking for new versions – here is the link to Fail2ban repository in Github:
https://github.com/fail2ban/fail2ban
Thanks Fail2Ban contributors and community for excellent piece of software!
3)
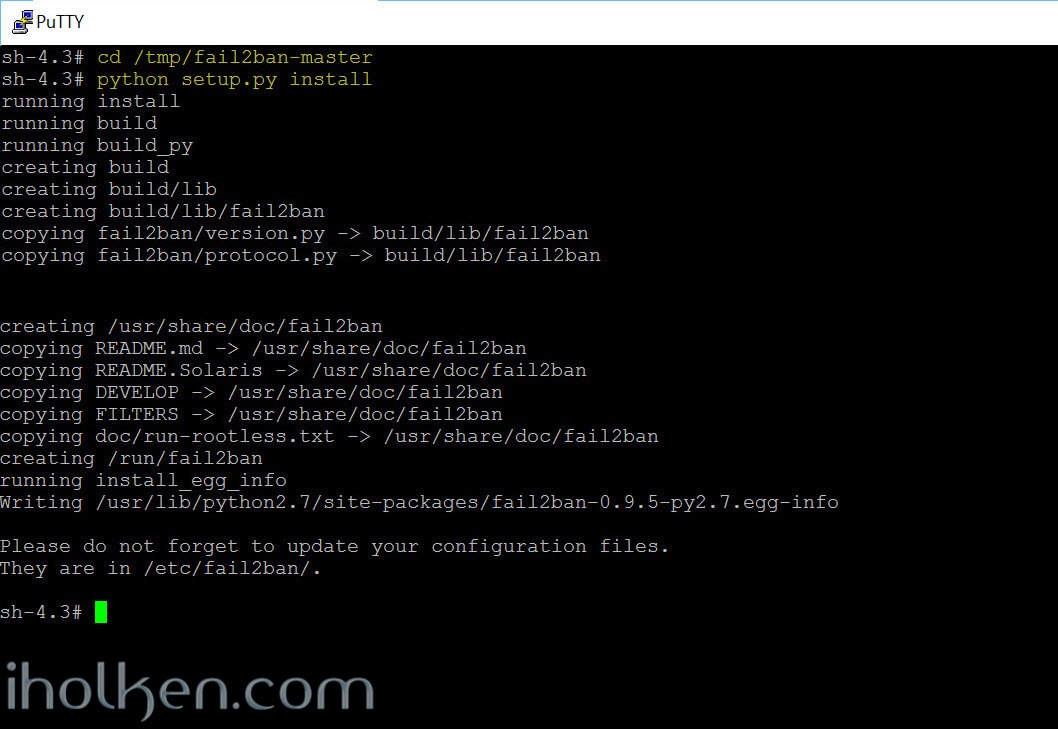
Lets continue with the installation.
Ensure that you are still in the correct directory, and use Python to install fail2ban:
1 2 3 |
cd /tmp/fail2ban-0.9.5 python setup.py install |
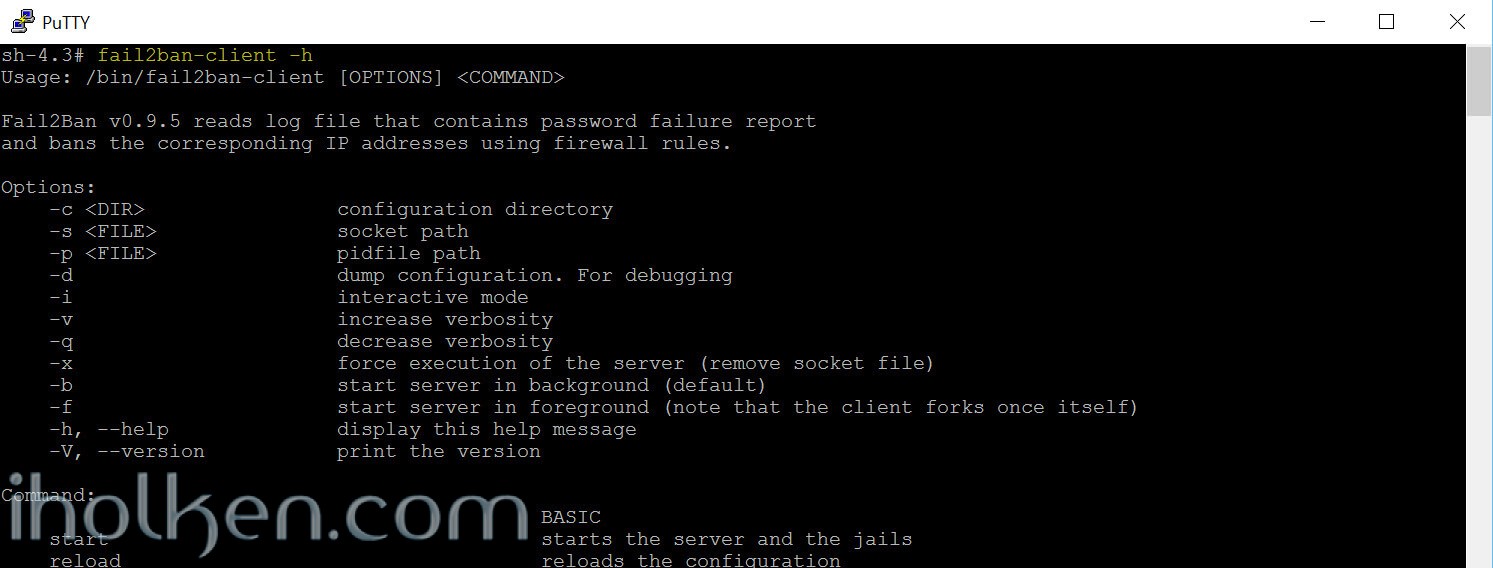
Check that fail2ban is now responding in your system:
1 |
fail2ban-client -h |
4)
I have decided to use route command for blocking incoming connections, instead of iptables [firewall] based command. Mainly because this will block conveniently the associated IP for all ports (!) in simple method. As I strongly believe if someone is trying to hack my services in one port, why shouldn’t he/she try to hack other services as well. Also the configuration is actually much more straightforward and reliable in Synology NAS environment.
Here is still the PRO’s and CON’s of this approach, as they are outlined by Author Michael Gebetsroither in the Fail2ban configuration files:
PROs:
- Works on all kernel versions and as no compatibility problems (back to debian lenny and WAY further).
- It’s FAST for very large numbers of blocked ips.
- It’s FAST because it Blocks traffic before it enters common iptables chains used for filtering.
- It’s per host, ideal as action against ssh password bruteforcing to block further attack attempts.
- No additional software required beside iproute/iproute2
CONs:
- Blocking is per IP and NOT per service, but ideal as action against ssh password bruteforcing hosts
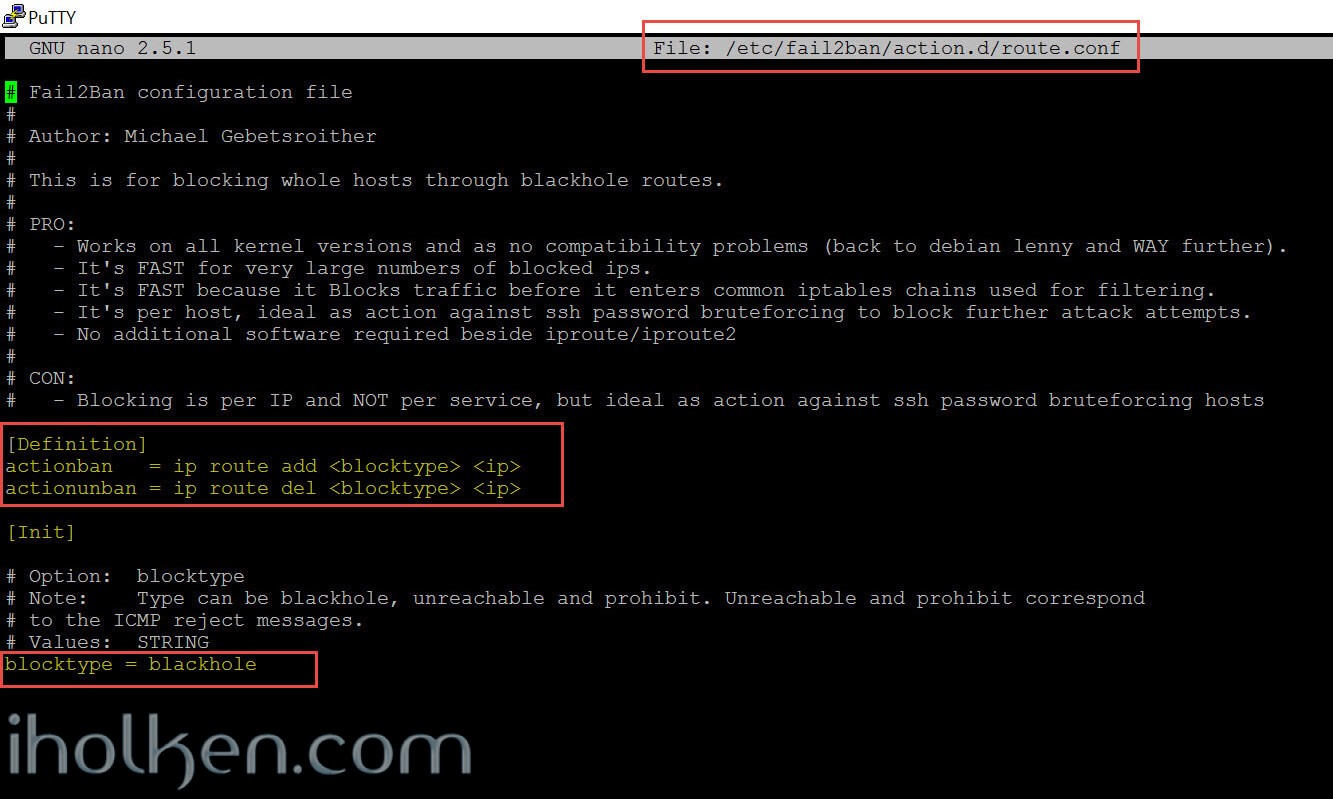
To reconfigure Fail2ban for using the route command instead of iptables, edit or create the route.conf file:
1 |
nano /etc/fail2ban/action.d/route.conf |
And modify the following lines to include exactly:
1 2 3 4 5 6 7 8 |
# Fail2Ban configuration file [Definition] actionban = ip route add <blocktype> <ip> actionunban = ip route del <blocktype> <ip> [Init] blocktype = blackhole |
There is 3 different options for the blocktype. Below is the simplified theory behind these options.
- Blackhole: It behaves like it’s name – any traffic sent there will not ever get there – nor will it provide any response. Eventually this will time-out. Perhaps more painful to legitimate customers.
- Unreachable: Should provide an ICMP message, trying to connect, but could not connect. No further information.
- Prohibit: Should provide an ICMP message, trying to connect, but telling that you are prohibited to connect.
I suggest you try all those options, and then decide what is best for your situation. I’m not actually even sure, if modern browser make any difference in what they show to users as the reason for connectivity error for above presented options.
5)
Fail2ban has a lot of pre-defined jails after installation, but they are not enabled by default. So if you start Fail2ban after installation, no jails are activated for monitoring the login attempts. I will not go through the whole original jail.conf file, but instead we are creating only the valid services and jails for our Synology NAS device, and these will be created into jail.local file, which is the expected user configuration file for Fail2ban.
Let’s create the local file by running:
1 |
nano /etc/fail2ban/jail.local |
Below is content of my jail.local file located in /etc/fail2ban/jail.local:
1 2 3 4 5 6 7 8 |
[DEFAULT] ignoreip = 127.0.0.1/8 192.168.168.0/24 bantime = 604800 findtime = 86400 maxretry = 4 backend = auto action = route |
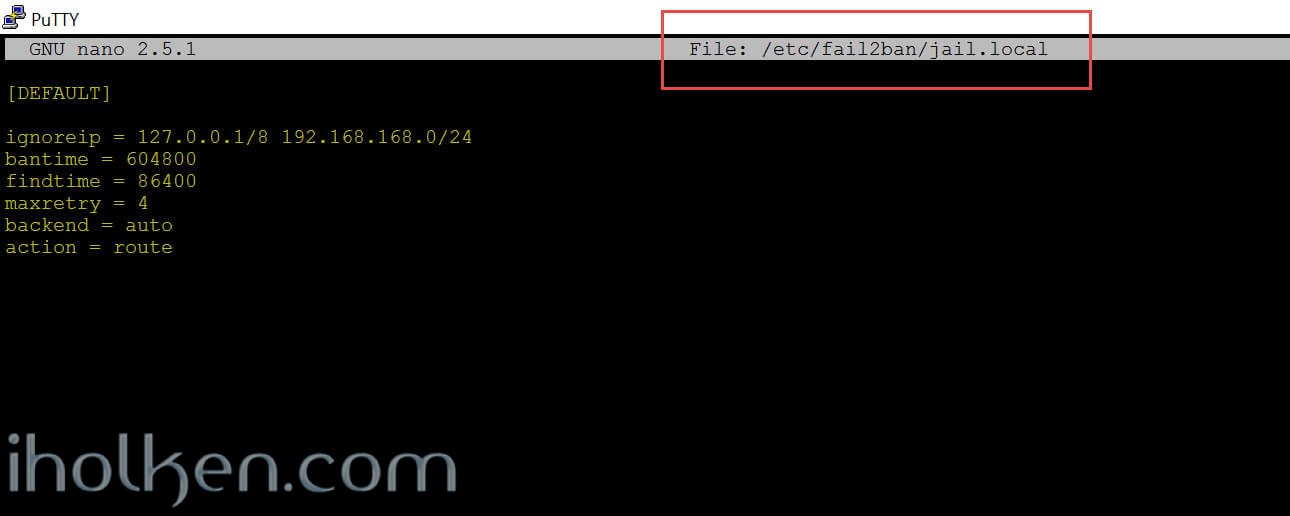
(Note: In the beginning when testing and configuring Fail2ban, I suggest you set [bantime = 60] and [findtime = 180]. So testing Fail2ban is a bit more convenient. Just remember to change those to desired values stronger once your setup is ready.)
Above we have now defined following data elements:
- ignoreip = such IP’s that should never be blocked, no matter how many incorrect logins (examples: localhost, or vpn-range)
- bantime = Time that IP will be blocked (seconds), 604800 = 7 days
- findtime = This is the monitored time, in within the wrong logins are recorded for triggering the jail, 86400 = 1 day
- maxretry = defines how many tries you can have within the defined monitoring time, 4 tries
- backend = This entry specifies how fail2ban will monitor log files. auto = fail2ban will try pyinotify, then gamin, and then a polling algorithm based on what’s available.
- action = defines the action, in here the route-action to block incoming connections
(Note: I am setting extremely strict default settings, if 4 wrong logins are detected within 1 day, block the IP for 7 days. You do not have to be this strict, so please modify the settings as you desire.)
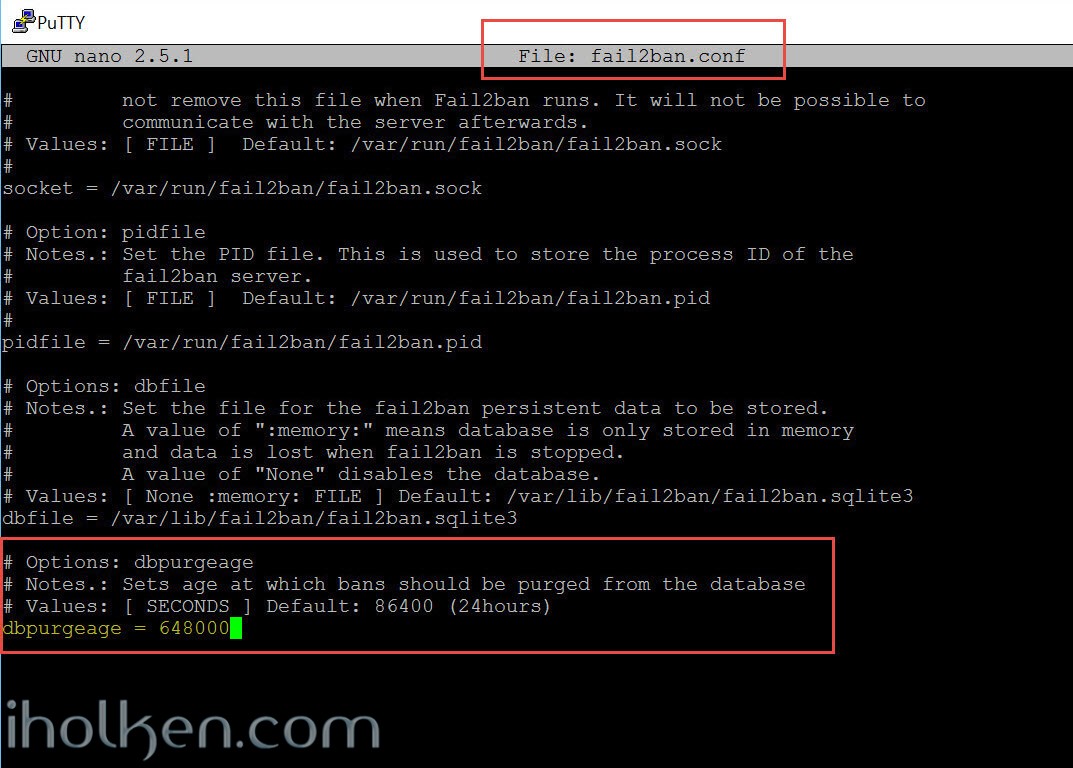
As I am setting such a long bantime (7 days) – I also need to modify the fail2ban data purge age (Default: 1 day) located in fail2ban.conf to 648000 (7.5 days):
1 |
nano /etc/fail2ban/fail2ban.conf |
6)
Now we have created the basic settings for Fail2ban, without any active jails. At this point we can try to start the Fail2ban service, and confirm that no errors are coming up with starting the service.
For this, I’m cycling following commands:
1 2 3 4 |
fail2ban-client status fail2ban-client start fail2ban-client status fail2ban-client stop |
We can see that the service is starting, then checking status –> there are no active jails, and then stopping service successfully.

7)
Now that we have created Fail2ban basic settings, before starting to configure the actual jails for the filters, let’s still configure the Fail2ban service to start automatically after Synology NAS reboot.
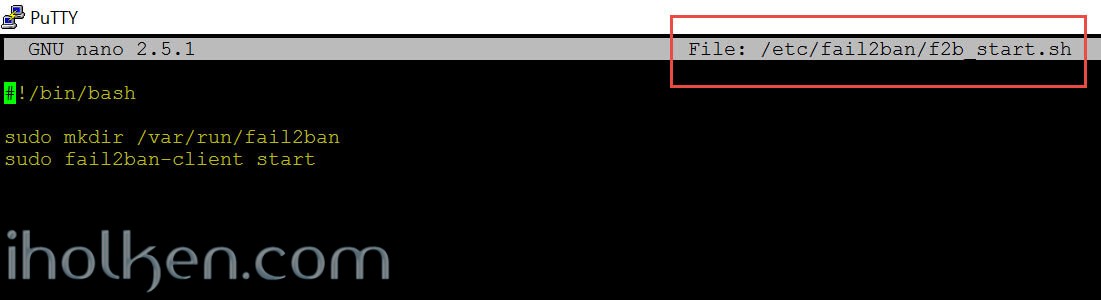
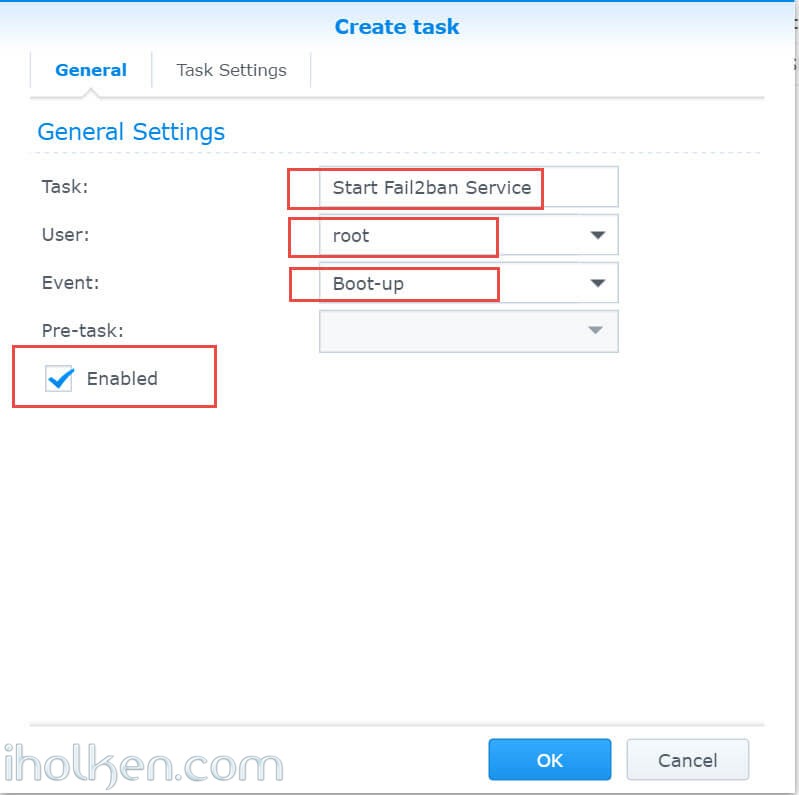
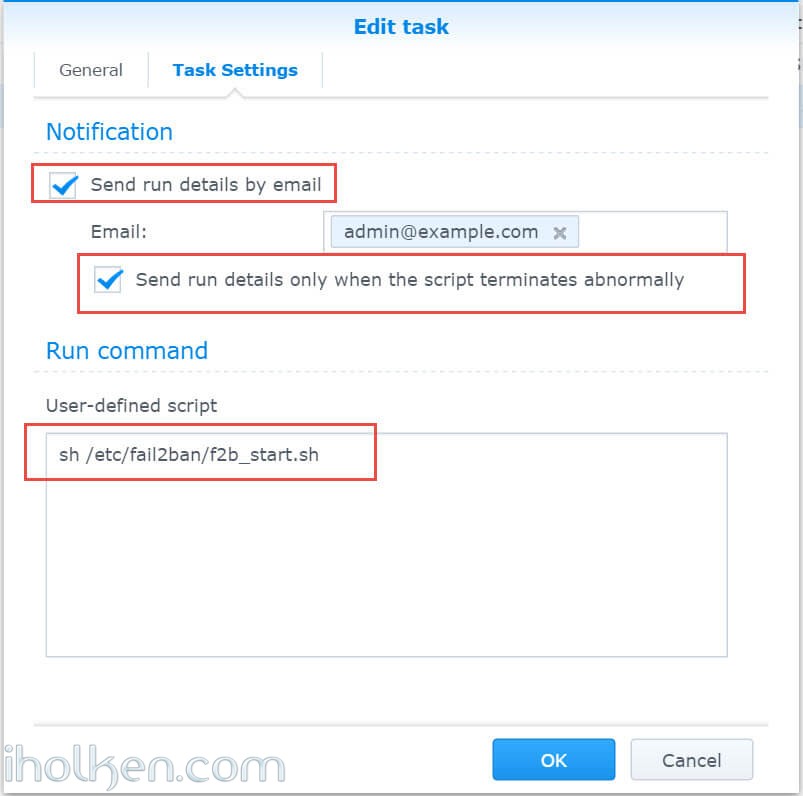
First we create a simple .sh script for starting the Fail2ban -service.
1 |
nano /etc/fail2ban/f2b_start.sh |
With following contents:
1 2 3 4 |
#!/bin/bash sudo mkdir /var/run/fail2ban sudo fail2ban-client start |
(We always need to create the /var/run/fail2ban folder for the Fail2ban socket file, otherwise Fail2ban will not start after reboot.)
Then save and assign permissions:
1 |
chmod 770 /etc/fail2ban/f2b_start.sh |
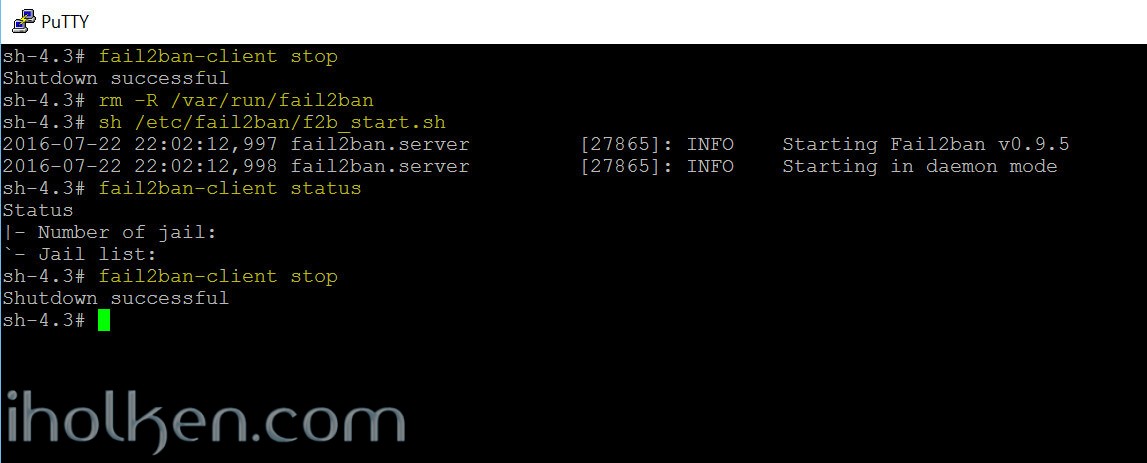
We can test this script by running the script. First we stop any running Fail2ban instances, delete the socket folder, then use script to start the service, then ask status again:
1 2 3 4 5 |
fail2ban-client stop rm -R /var/run/fail2ban sh /etc/fail2ban/f2b_start.sh fail2ban-client status fail2ban-client stop |
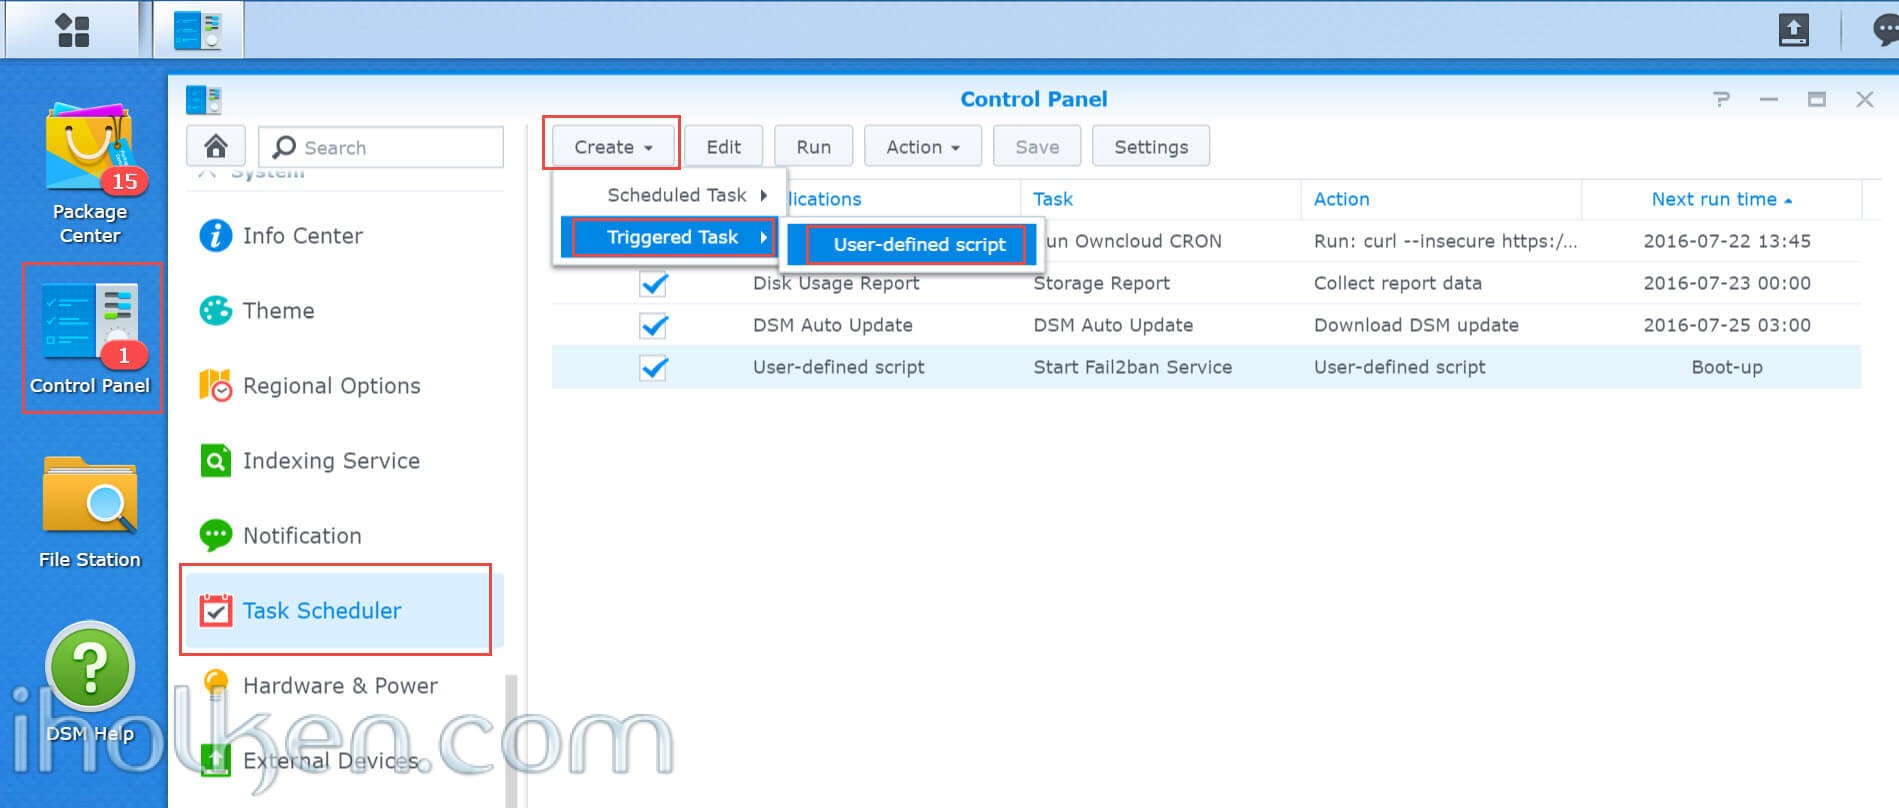
And then we create into Synology task scheduler a triggered On-Start task.
Login to DSM –> Control Panel –> Task Scheduler –> Create –> Triggered Task –> User-defined script
See below screenshots on further instructions. You can also define email alerts for execution or abnormal behaviour of your, if you so desire.
Now we can actually test our created task by highlighting the task in scheduler, right-clicking the row and selecting ‘RUN’. Check the service status before and after, for confirmation that our created task is working.
Let’s first stop the Fail2Ban and delete the existing socket folder:
1 2 |
fail2ban-client stop rm -R /var/run/fail2ban |
Then run the Scheduled task in DSM:
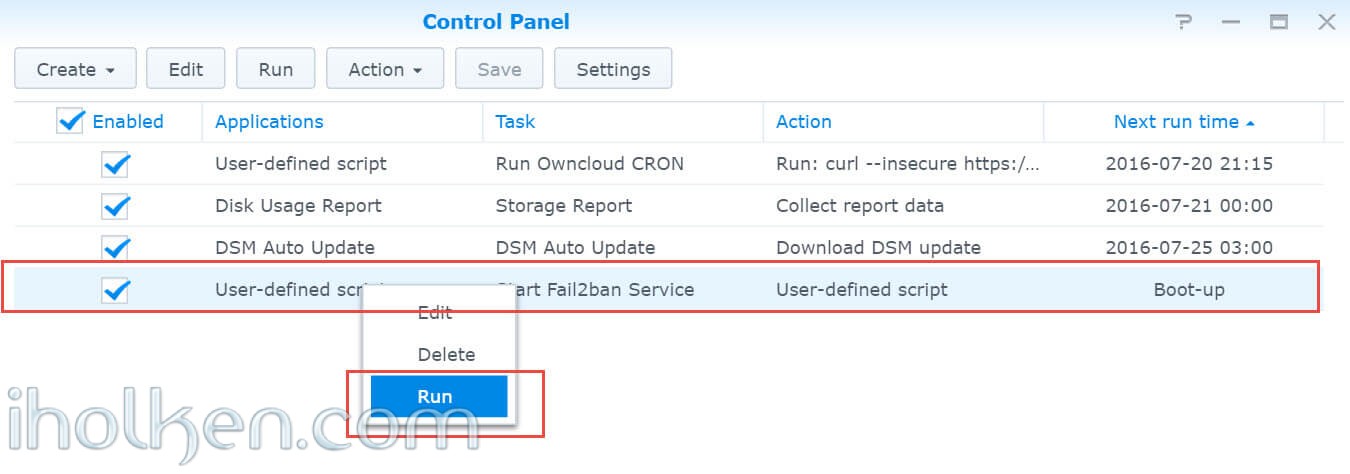
Now you can check if the services are running:
1 |
fail2ban-client status |
If the test was successful, you can shut down the Fail2ban service:
1 |
fail2ban-client stop |
Even though this is quite thorough testing, I still recommend live test and re-starting your NAS and checking Fail2ban service status still after re-start. After that you can be sure that it will work going forward. Please note, that it will take a short moment after re-start that the on-boot task will be run in Synology scheduler – so please be patient when testing, Synology will start all the DSM services first.
NOW we have setup the Fail2ban service in our Synology NAS. Next step is to define the first jail for Owncloud.
8)
Owncloud JAIL configuration
Owncloud needs to have logging enabled, and the log timestamps need to be correct. The early versions of Owncloud 9 had issues with log timestamps, so in case your version is impacted from that issue, we need to fix that first.
Note: This step is valid only if your Owncloud log timestamps does not match with real timezone and time in your server, and this depends your Owncloud 9 version and when you downloaded it from Owncloud.org. As per my understanding this has been backported to the Owncloud 9 installation package afterwards since its release.
If your log timestamps are matching with system time –> proceed to step 9.
1 |
nano /volume1/web/owncloud/lib/private/log/owncloud.php |
and replace strings from this:
1 2 3 4 |
$time = DateTime::createFromFormat("U.u", number_format(microtime(true), 4, ".", ""), $timezone);
if ($time === false) {
$time = new DateTime(null, $timezone);
}
|
exactly to this (all characters):
1 2 |
$time = DateTime::createFromFormat("U.u", number_format(microtime(true), 4, ".", ""));
$time ? $time->setTimezone($timezone) : $time = new DateTime(null, $timezone);
|
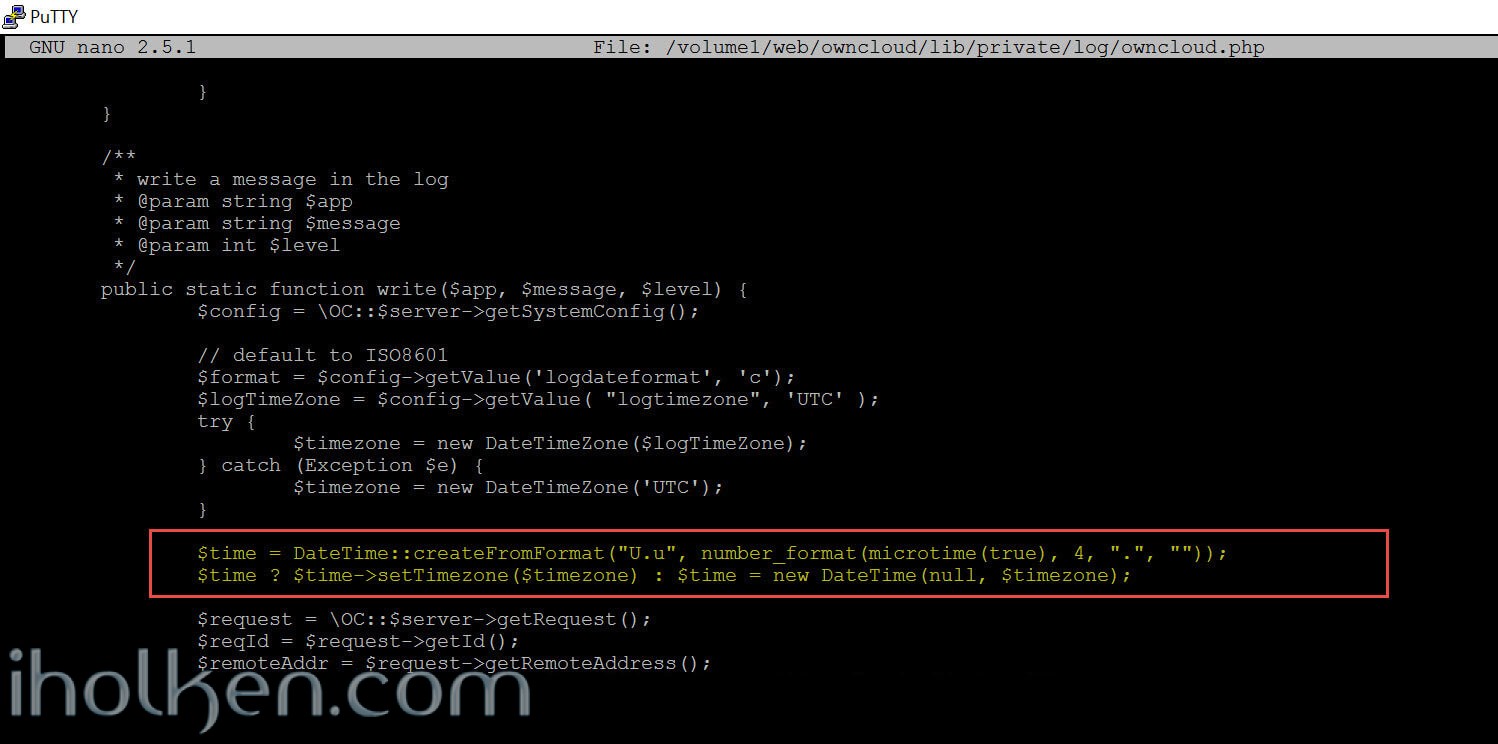
And check if the Owncloud log timestamps are now matching your real system time.
9)
Now that we have confirmed that the Owncloud logging is working, we can start configuring Owncloud and Fail2ban to work together (if your Owncloud is installed in different path, modify accordingly).
Sudo root and edit owncloud config.php -file:
1 2 |
sudo -su root nano /volume1/web/owncloud/config/config.php |
You have to look for these values:
1 2 3 4 |
'loglevel' => '2', 'logfile' => '/volume1/logs/owncloud.log', 'logtimezone' => 'Europe/Helsinki', 'logdateformat' => 'Y-m-d G:i:s', |
NOTE: ‘logdateformat‘ is important, it really needs to be compatible with Fail2ban. Please use this format – otherwise Fail2ban will not work/block. ‘loglevel’ needs to be ‘2’. Logtimezone needs to be correct, the time in your logs and time in your server needs to match – otherwise your timings in configuration will not work and Fail2ban will not block.
Of course YOUR log Owncloud location and timezone should be the valid values for your setup. If you do not find the logfile location defined, it is by default in your Owncloud data folder. In that case you can (if you want) define it elsewhere with above line in Owncloud config.php.
I have personally changed the default owncloud log location to be outside from Owncloud default directories.
Here is how I created the directory:
1 2 3 4 |
cd /volume1 mkdir logs chown -R http:http logs chmod -R 770 logs |
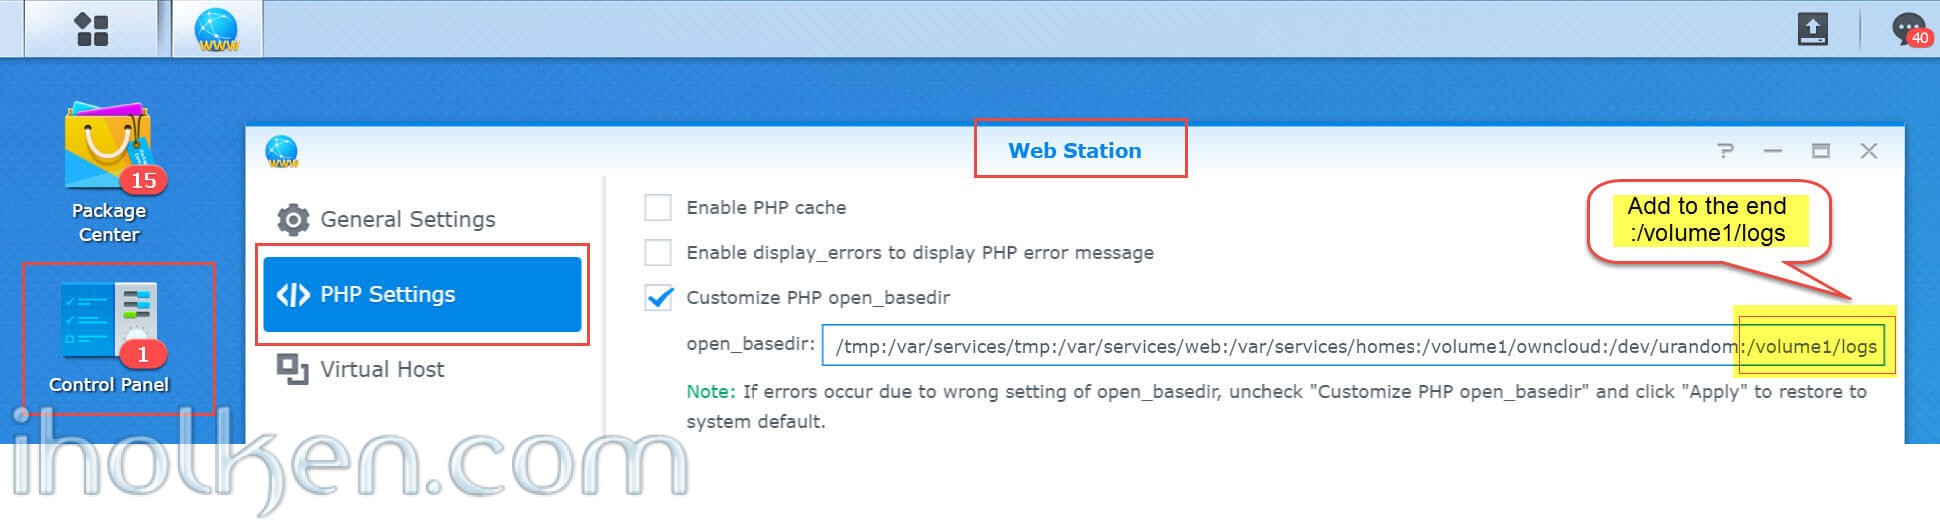
Then, if you are utilizing the PHP open_basedir configuration restriction, you still need to add the new created logs folder there, otherwise PHP will not have the right to write there (with reference my blog about Owncloud installation to Synology NAS).
String needed to add is [ :/volume1/logs ]
And next we should verify that logging works, do couple failed logins and check the owncloud logs.
This is how it looks in Owncloud portal Admin section, under log:
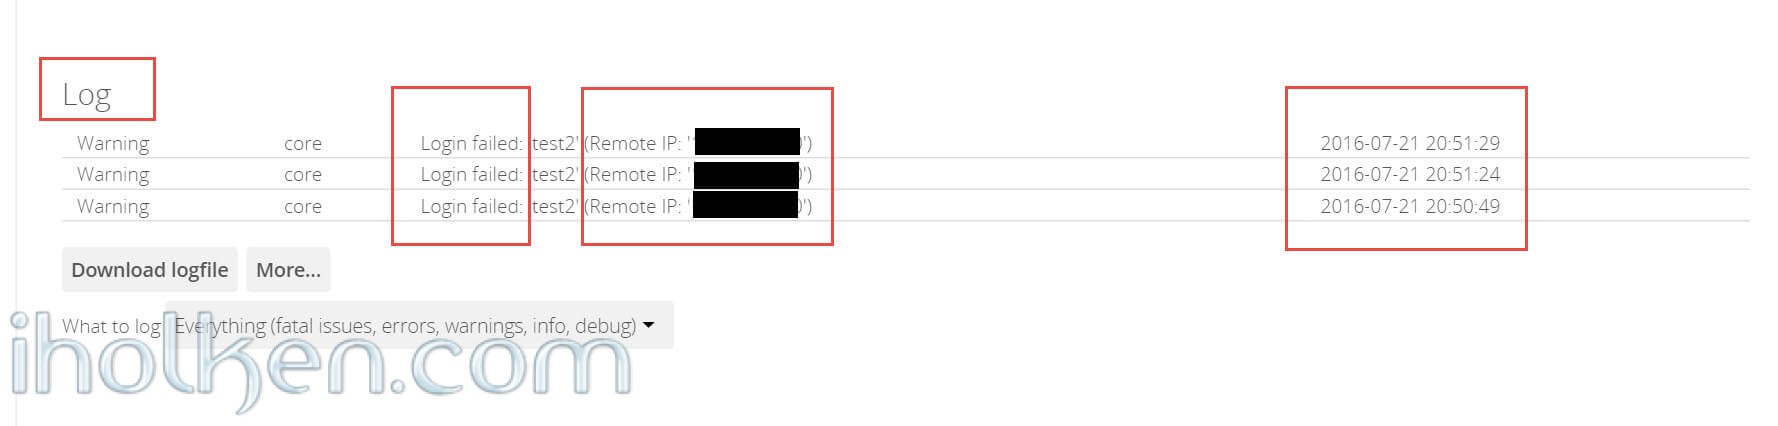
(From this point onwards, if your Owncloud log path location is different from mine, modify accordingly the path in commands)
And this is how the failed attempts SHOULD now look in your Owncloud log file.
1 |
nano /volume1/logs/owncloud.log |
Related log file rows:
1 2 3 |
{"reqId":"r+buGVNHJYFbyFHT\/R7M","remoteAddr":"192.168.4.40","app":"core","message":"Login failed: 'test2' (Remote IP: '192.168.4.40')","level":2,"time":"2016-07-21 20:50:49","method":"POST","url":"\/"}
{"reqId":"XtHF2MGlCw6I0TCslbxC","remoteAddr":"192.168.4.40","app":"core","message":"Login failed: 'test2' (Remote IP: '192.168.4.40')","level":2,"time":"2016-07-21 20:51:24","method":"POST","url":"\/"}
{"reqId":"OuW1heAPC6mZZ82FUspL","remoteAddr":"192.168.4.40","app":"core","message":"Login failed: 'test2' (Remote IP: '192.168.4.40')","level":2,"time":"2016-07-21 20:51:29","method":"POST","url":"\/"}
|
10)
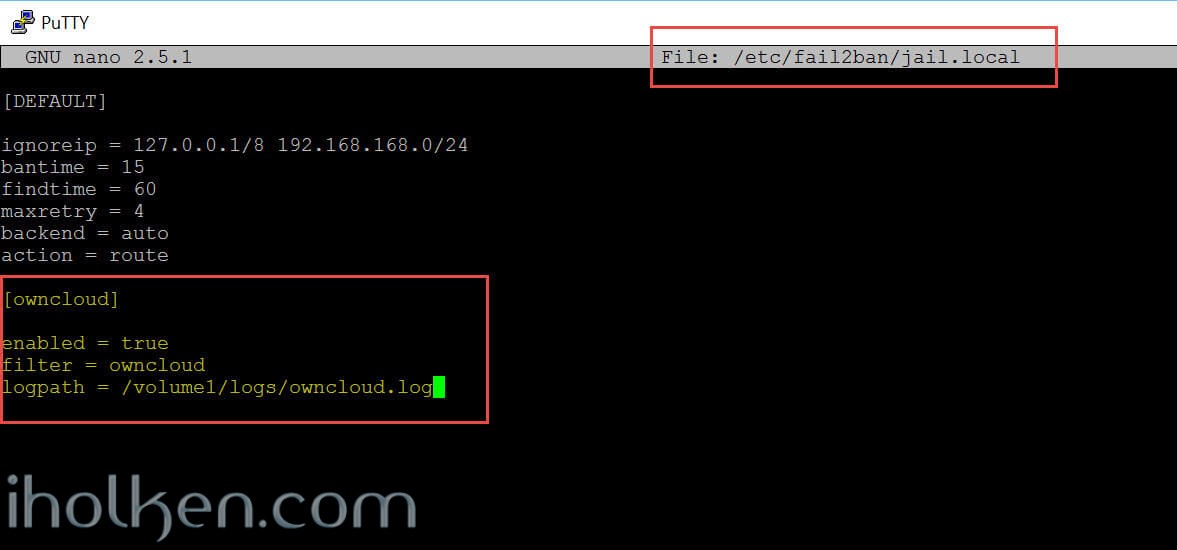
Now we need to further modify the new jail.local file we created, to point to the filter for owncloud, modify the logpath accordingly for your owncloud log location:
1 |
nano /etc/fail2ban/jail.local |
Now we should add the Owncloud section under the [DEFAULT] section defined earlier:
1 2 3 4 5 6 7 8 9 10 11 12 13 14 |
[DEFAULT] ignoreip = 127.0.0.1/8 192.168.168.0/24 bantime = 604800 findtime = 86400 maxretry = 4 backend = auto action = route [owncloud] enabled = true filter = owncloud logpath = /volume1/logs/owncloud.log |
Here we have defined following data elements for Owncloud Jail:
- enabled = true or false, defines if jail is active or not
- filter = Points Owncloud jail to filter named owncloud for configuration
- logpath = is the exact path to log file for owncloud jail, that is monitored for identifying the failed login attempts (according to failregex defined below)
This is how the file should look after modification:
Next we create the Owncloud filter itself:
1 |
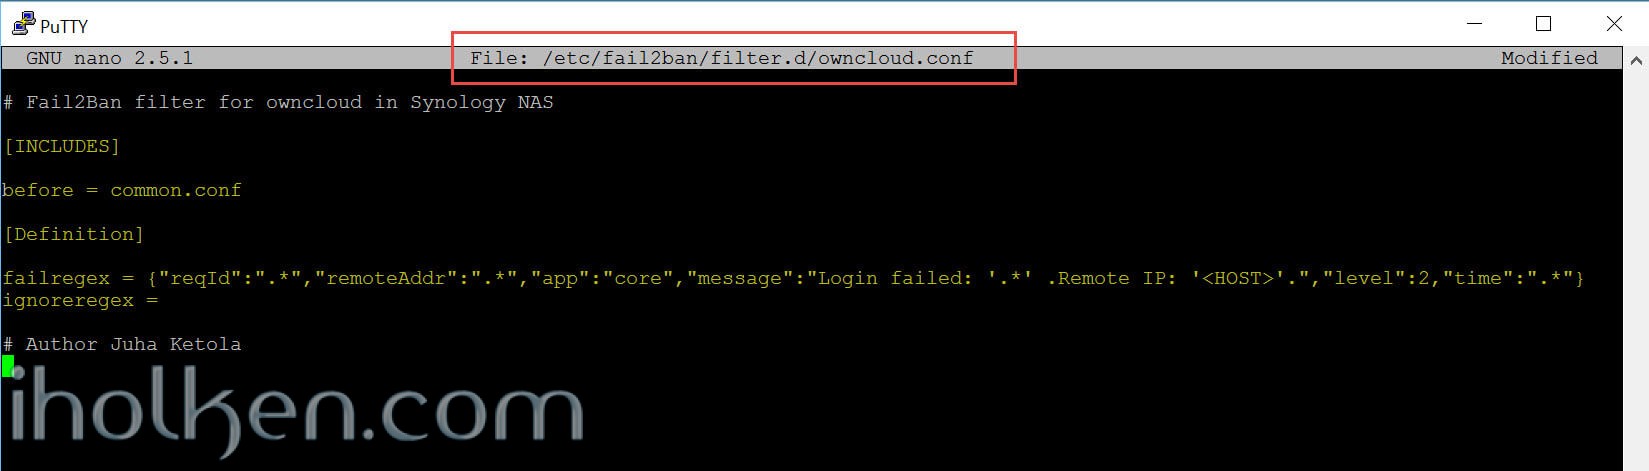
nano /etc/fail2ban/filter.d/owncloud.conf |
And we create these lines into the file:
1 2 3 4 5 6 7 8 9 10 11 12 13 14 |
# Fail2Ban filter for owncloud in Synology NAS

[INCLUDES]

before = common.conf

[Definition]

_daemon = owncloud

failregex = {"reqId":".*","remoteAddr":".*","app":"core","message":"Login failed: '.*' .Remote IP: '<HOST>'.","level":2,"time":".*"}
ignoreregex =

# Author Juha Ketola
|
File after creation:
11)
Now that you have created your failregex for Owncloud, we have the possibility to manually test the failregex we created against the Real log events for failed login attempts in Owncloud.
First we empty the current Owncloud log:
1 |
echo '' > /volume1/logs/owncloud.log |
Then create few failed logins into owncloud (note: you need to do all this within the time [findtime] you defined earlier).
Now we can test the failregex against the Owncloud log events we just did using this command:
1 |
fail2ban-regex /volume1/logs/owncloud.log /etc/fail2ban/filter.d/owncloud.conf |
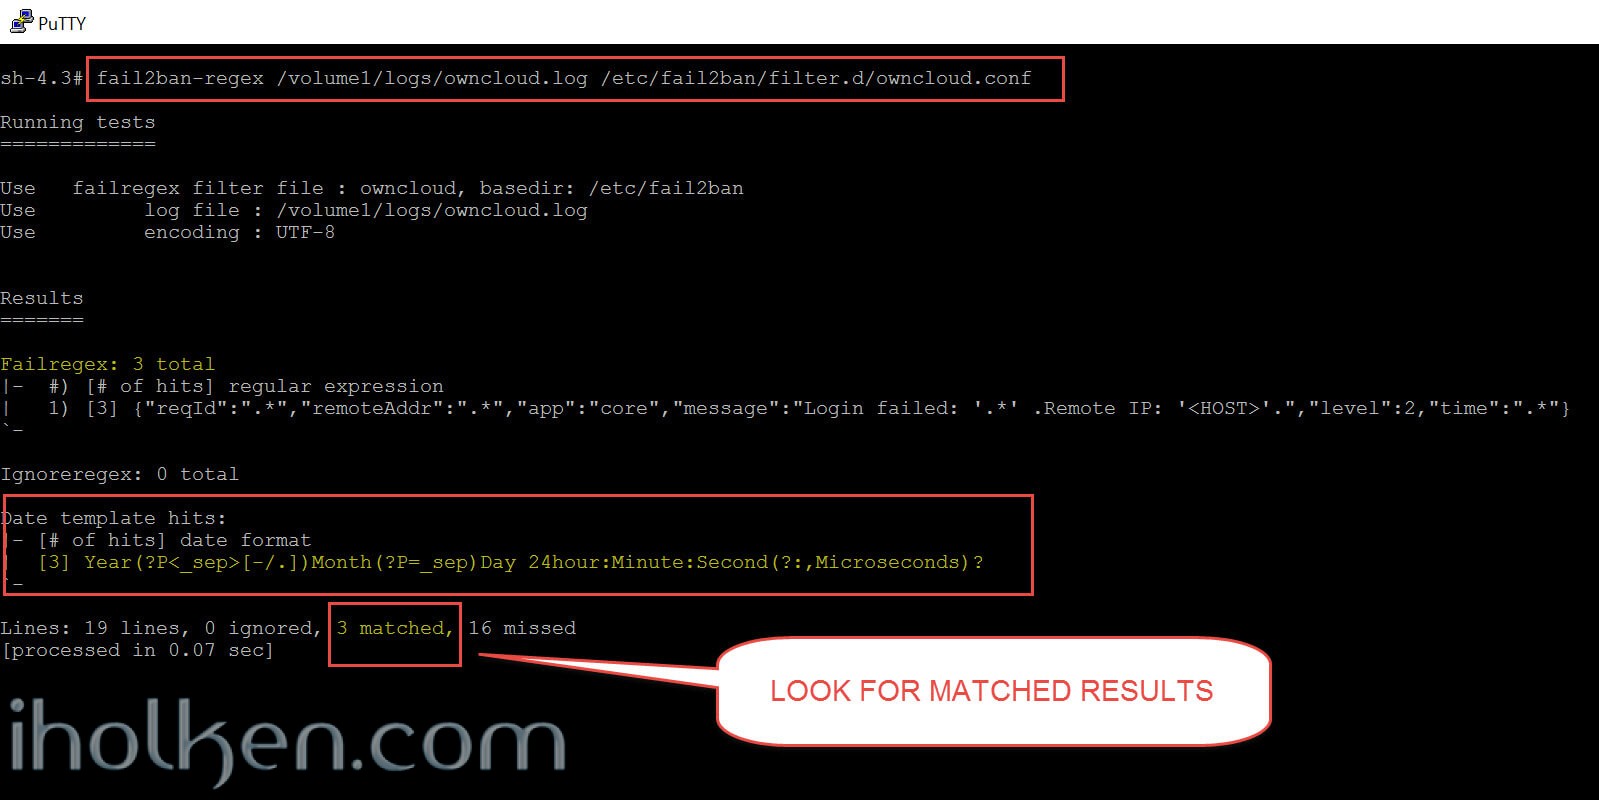
You should search from the failregex result (see above screenshot):
- [MATCHED] results – these are matches for the failregex we made
- Date template hits – these confirm that Fail2Ban at least thinks it is understanding the date/time format in your log correctly
12)
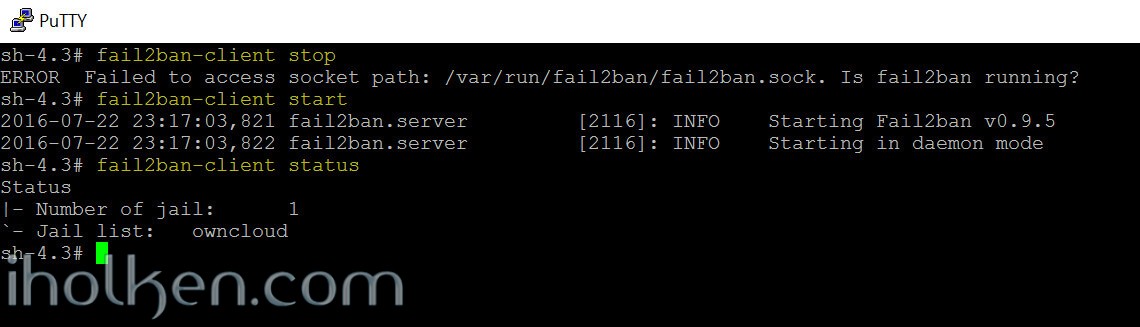
Now that you have configured your Fail2ban service for Owncloud, it is time to start the Fail2ban service with following commands:
(In case you have it already running, let’s first stop the server and then start it again)
1 2 |
fail2ban-client stop fail2ban-client start |
Let’s then check the Fail2ban service status:
1 |
fail2ban-client status |
The output should be similar to what I have below, Fail2ban starter with one active Jail [Owncloud]:
13)
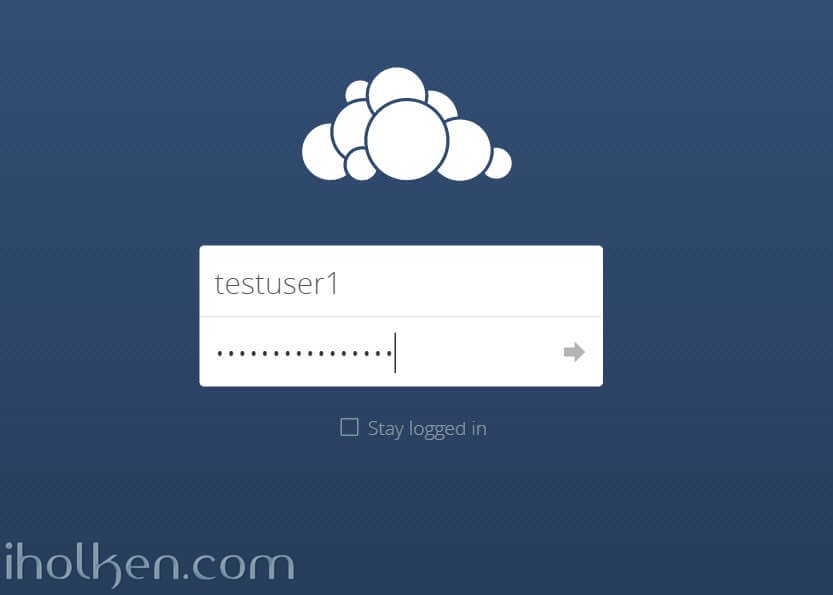
Now finally after all the setup, configuration and testing – it has come the time to really test the fail2ban service operation by accessing the real service under monitoring [Owncloud].
I STRONGLY recommend you to test and confirm functionality from an IP address on the WAN side, using completely external IP from your LAN network. The routing in your internal LAN is not reliable for testing – you can’t really make justifications based on that. So please test from outside, and from an ipv4 address (check and confirm with Whatismyip.com if not sure othjerwise).
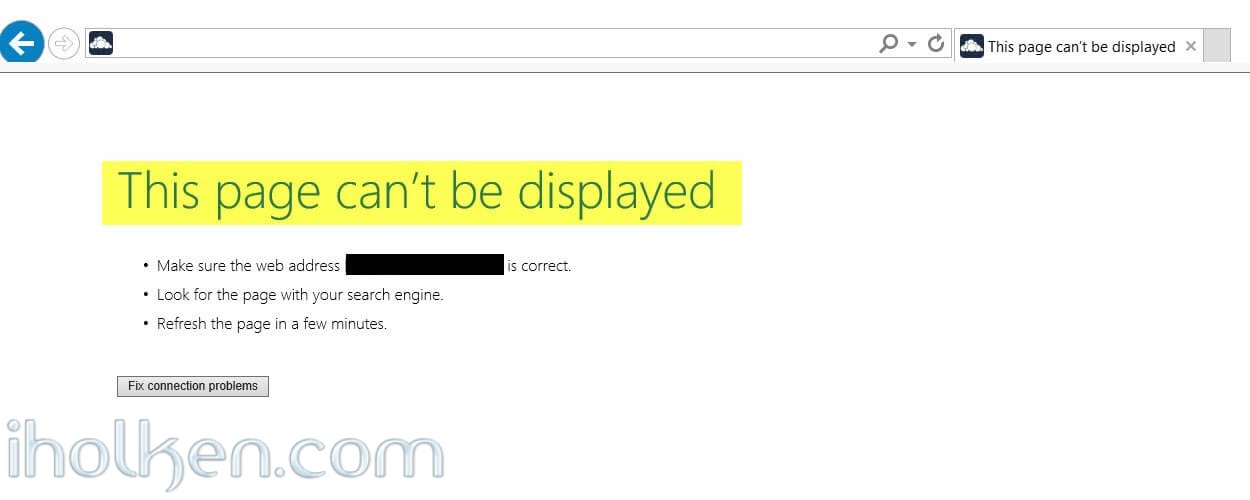
Here is my test results – I will try with incorrect account too many times – thus resulting [Page not available error] after 4th login attempt:
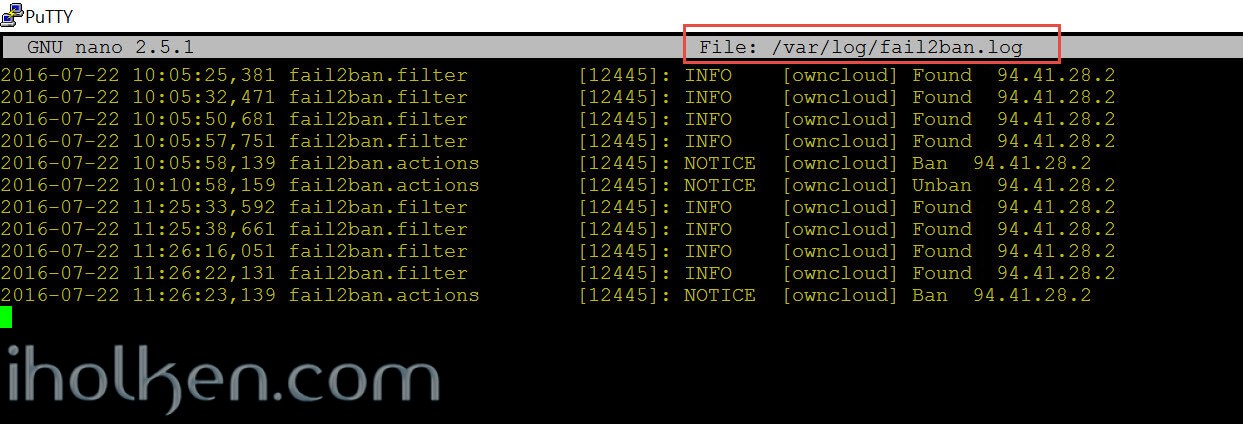
And this is how it all looks in your Fail2ban log (I hope your Fail2ban.conf logsetting is [INFO]:
1 |
nano /var/log/fail2ban.log |
14)
In case you run into issues / errors while setting this up using this guide, here is few troubleshooting tips:
- Doublecheck all the steps and settings
- Use fail2ban-regex tool for testing your new failregex configurations, so that you get those MATCHES
- Inspect Fail2ban log file, located in /var/log/fail2ban.log
- Set TEMPORARILY the log detail setting in Fail2ban.conf file to [DEBUG], you get a lot of useful information to your logfile
- Don’t forget to set logging level back to [INFO] in fail2ban.conf, after you have solved your issues
15)
Most important Fail2Ban commands for manual operations
These commands presented below can be executed using:
1 |
fail2ban-client <COMMAND> |
BASIC COMMANDS
<COMMAND> – Description
- start – starts the Fail2ban server and the enabled jails
- reload – reloads the Fail2ban configuration
- reload <JAIL> – reloads the specified jail <JAIL>
- stop – stops all Fail2ban jails and terminates the Fail2ban server
- status – gets the current status of the Fail2ban server
- ping – tests if the Fail2ban server is alive
List current routes:
ip route list
List current route bans specifically with blocktype blackhole:
ip route list | grep blackhole
Add manually a route ban using directly IP route command:
ip route add blackhole <IP>
Remove manually a route ban using directly IP route command:
ip route del blackhole <IP>
For all commands, you can check the Fail2Ban wiki:
http://www.fail2ban.org/wiki/index.php/Commands
[DSM upgrade note 30.7.2016]
After installation and configuration of Fail2ban, I did 2 DSM updates, and updated roughly 15 other packages including web station, PHP etc. in my Synology NAS device. After successful update & long lasting reboot – Fail2ban will not start. Synology updates will clean/overwrite some of the system folders where Fail2ban is installed. However – all your configurations and jails are still present in /etc/fail2ban folder, so all you need to do for enabling Fail2ban again in your system, is to run below commands in given order – and your services are protected with Fail2ban again:
1 2 3 4 5 6 |
wget --no-check-certificate https://github.com/fail2ban/fail2ban/archive/0.9.5.tar.gz -O /tmp/fail2ban_0.9.5.tar.gz cd /tmp tar -zxvf fail2ban_0.9.5.tar.gz cd /tmp/fail2ban-0.9.5 python setup.py install fail2ban-client start |
This was the guide for settings up Fail2ban and configuring Jail for Owncloud. I hope this helps you in improving the security of your system.
If you got your setup working using this guide, or you have any questions regarding any of the steps in above guide – please throw me a post or feedback in below form! Thanks!

Juha Ketola


New post about Fail2ban installation on Synology NAS devices published. Also including jail configuration for Owncloud. Take a look and improve your security!
/Juha
Hi Juha,
thank you for this great tutorial! it works great on DSM final update 2
Thanks for the feedback – appreciated.
Great to hear it worked out for you!
/Juha
Hello, thank you very much for this tutorial, it was very good for me. I just wanted to know if you are going to update to the latest version of fail2ban as you comment. I would come very well, greetings.
Getting error
“creating /usr/lib/python2.7/site-packages/fail2ban
error: could not create ‘/usr/lib/python2.7/site-packages/fail2ban’: Permission denied
”
Im guessing its due to login as admin not root ??
ok I just reran w sudo
rookie mistake
Hello
i have so many connections from china trying to ssh my syno..
i deactivated ssh.
As a newbie, i sudoed my mac to check python, and checked the packages on the syno. both are correct. but i am blocked at step 2.
i don’t have terminal on the syno, just on the mac.
and the commands don’t seem to work..
could you please help me ?
Is there any possible way to creat a packeage for the synos?
thank you