
In this post I will go through installation of Redis server and phpredis (extension for using Redis server with php) into Synology NAS running DSM 6 release candidate (without bootstrapping). Redis is an open source, advanced in-memory key-value store. It is often referred to as a data structure server since the keys can contain strings, hashes, lists, sets and sorted sets. Redis server can be used for example cache and transactional file locking (Owncloud platform).
This is not the only way to install these modules, but this is ONE way that I can confirm to work (at least for me).
Few assumptions made for this guide:
- Synocommunity is enabled into Synology as package source, and PHP has been already installed to Synology NAS (php-cli enabled)
- NANO is installed from Synocommunity so you can edit text files through SSH
- This guide is made with Synology NAS and DSM 6 RC (release candidate)
- Synology NAS has SSH enabled and user knows how to utilize SSH terminal connection
- I have tested the setup with 2 Synology NAS devices:
- 1) DS214 (32-bit)
- 2) RS815+ (64bit)
- And this process is confirmed to work for both NAS devices. However there are different steps required, depending if target NAS device is 32bit or 64bit. This guide has the required steps for both included now – so follow instructions carefully.
- I cannot guarantee that ALL other Synology NAS devices are working – but please post results below in case you have tried and tell your model so people will know.
- And finally – you try this with your own responsibility, I have no guarantees for the results or that this will work for any other than my Synology NAS devices. 🙂
About the installation
The installation has 2 phases. In the first phase we install Redis server and make sure it is running correcly. In the second phase we install phpredis php extension, that will enable Redis server utilization through PHP, and we also confirm that it is running correctly. Finally we make the necessary changes to Owncloud configuration in order to support Redis cache and transactional file locking in Synology NAS running DSM 6 release candidate.
Installation steps – Phase 1 (installation of Redis server)
1) First we need to install Redis server from Synocommunity. Go to Synology Package center and install it from there. If you can’t find it, enable Synocommunity as package source and then you will find it.
2) After installation Start Redis server from Package Center – and IF it starts correctly you get status ‘running’ :
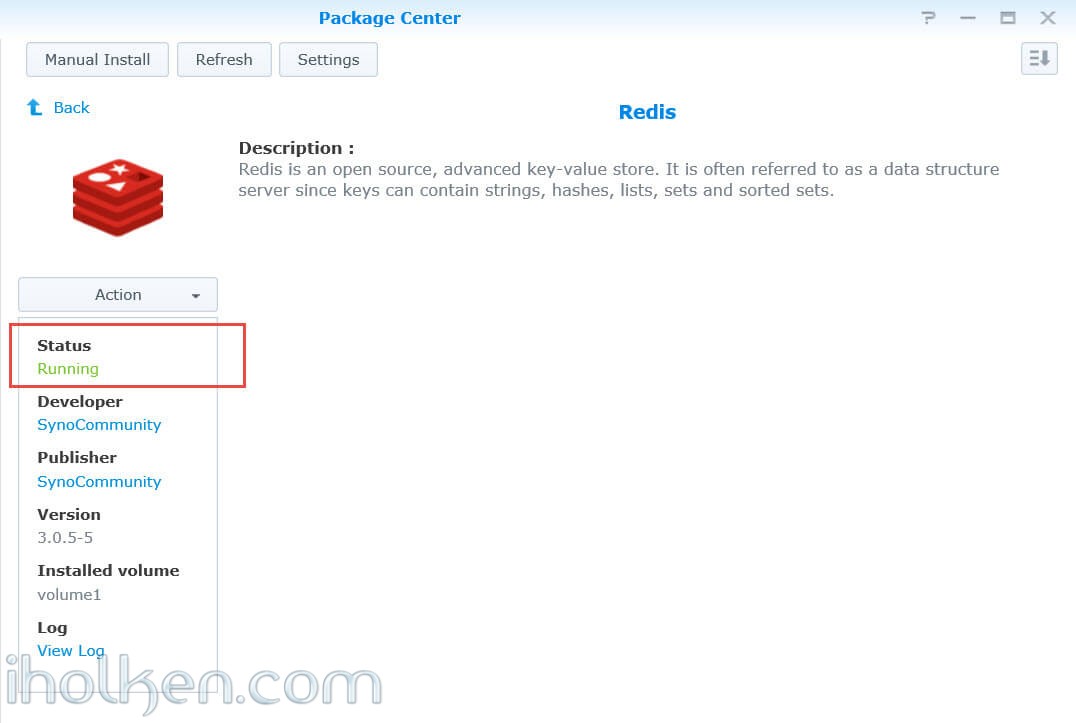
If you got the Redis server running in package center – you can go directly to step 4 where we really confirm it is running. Otherwise proceed to next step where we troubleshoot the possible START issue in DSM 6.
3) I did not get the Redis server running in package center after install. In order to get it working, I needed to modify the Redis start script – ‘start daemon ()‘ section.
1 2 3 4 5 6 |
login as: admin admin's password: xxxxxxxxxx admin:~$ sudo -su root Password: xxxxxxxxxxx sh-4.3# cd / sh-4.3# nano var/packages/redis/scripts/start-stop-status |
Please modify the start script accordingly:
1 2 3 4 5 |
start_daemon ()
{
setuid redis
exec /usr/local/redis/bin/redis-server /usr/local/redis/var/redis.conf
}
|
And this the how it looks in NANO:
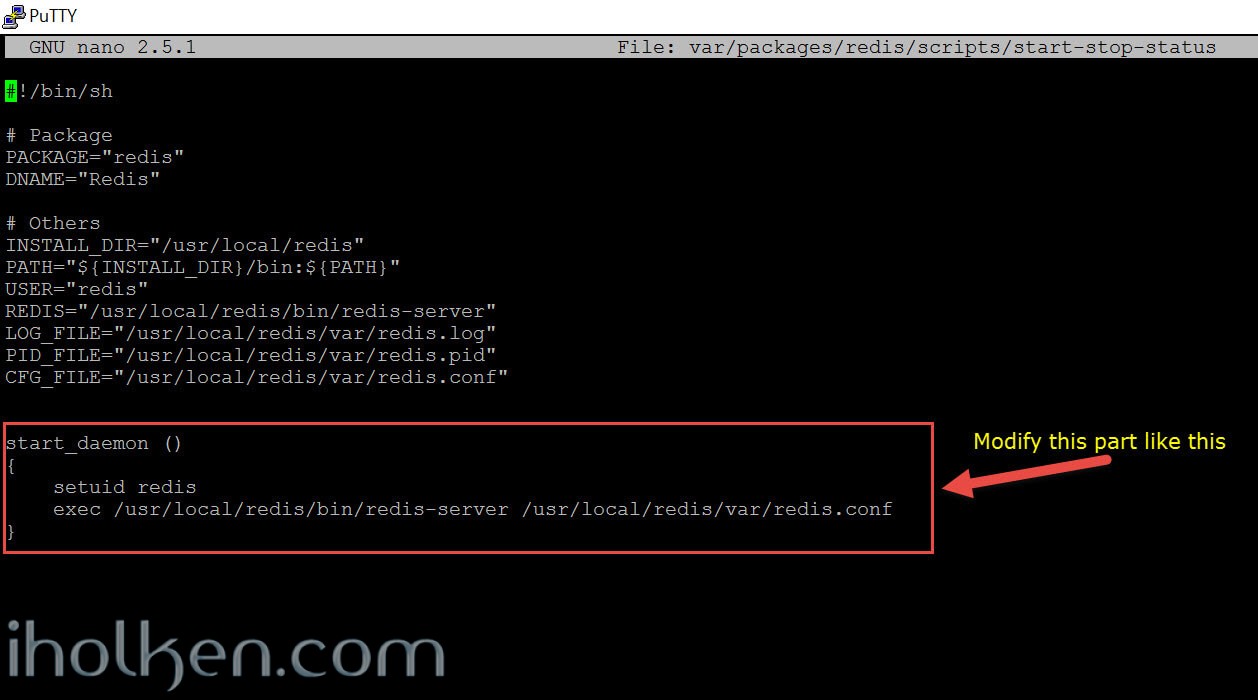
After this modification, the Synology package center Redis START-STOP are working for me without issues.
4) Let’s make sure Redis server is running and working as expected:
Check that processes are running, and check Redis PING-PONG test:
1 2 3 4 5 6 7 8 9 10 11 12 |
login as: admin admin's password: xxxxxxxxxx admin:~$ sudo -su root Password: xxxxxxxxxxx sh-4.3# cd / sh-4.3# ps aux | grep redis-server root 3029 0.0 0.1 4628 784 pts/6 S+ 00:48 0:00 grep redis-server root 17453 0.1 0.2 20100 1384 ? Ssl Mar07 18:25 /usr/local/redis/bin/redis-server *:6379 sh-4.3# /usr/local/redis/bin/redis-cli ping PONG sh-4.3# |
And here is the terminal outputs:
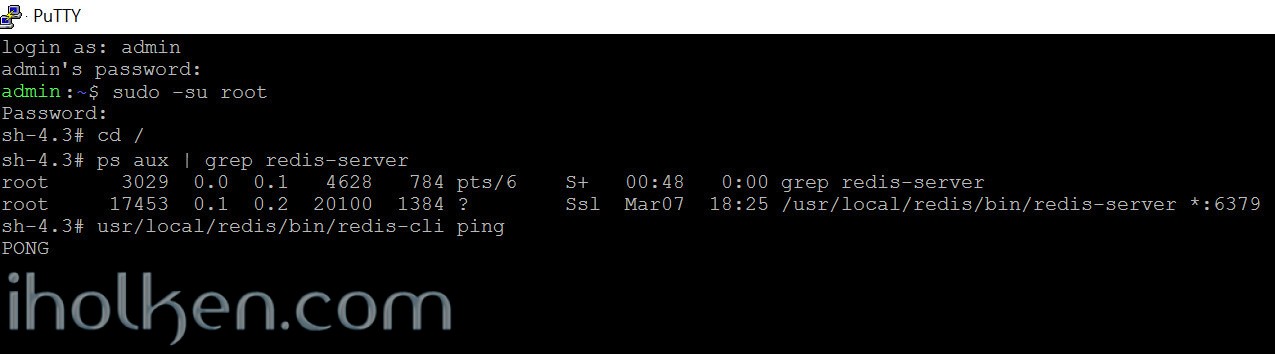
If you have the Redis processes running ang Redis will respond to your PING with a PONG, you have setup Redis server correctly. Next we install the PHP extension for Redis.
Installation steps – Phase 2 (installation of phpredis extension)
In order in install phpredis extension – we need to install couple new packages into our Synology. These packages are not available from Synology package center, and I don’t want to start bootstrapping with ipkg –> I chose the approach to utilize ‘Debian chroot’ package from Synocommunity.
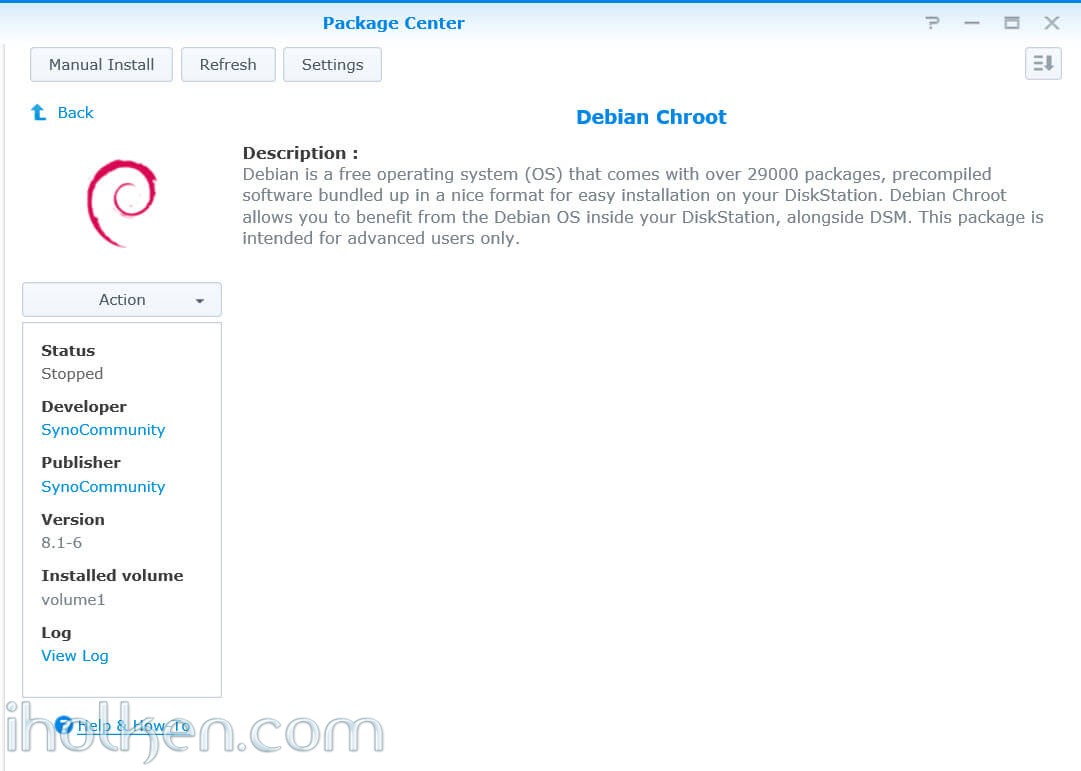
Debian is a free operating system (OS) that comes with over 29000 packages, precompiled software bundled up in a nice format for easy installation on your DiskStation. Debian Chroot allows you to benefit from the Debian OS inside your DiskStation, alongside DSM. And as this is used only for one-time install purposes, you can actually remove the Debian chroot from Synology package center afterwards – if wanted.
1) As a first step – install Debian chroot package from Synocommunity in Synology Package Center (no need to start the package in package center).
Once installed – login through SSH, sudo to Root and run through following commands in terminal:
1 2 3 4 5 |
sudo /var/packages/debian-chroot/scripts/start-stop-status chroot /usr/bin/apt-get update /usr/bin/apt-get install php5-dev /usr/bin/apt-get install php5-redis |
The first command will start Debian chroot and bring you to the Debian terminal – and the next three commands will update packages and install php5-dev and php5-redis modules.
Now at this point we should test that the phpredis -module is working with the Debian chroot environment, so please still stay in the Debian chroot terminal and give following command there:
1 2 3 |
php -r "if (new Redis() == true){ echo \"\r\n OK \r\n\"; }"

OK
|
If you go the response ‘OK’ – that means PHP can trigger the Redis in Debian chroot environment. However – we need to do few more things in order to make this work with Synology default PHP / webserver as well.
Please exit from the Debian chroot terminal (exit), back to Synology DSM ssh terminal, still being ‘sudo root’.
Below we have 32bit and 64bit versions, please choose your section based on target NAS you would be deploying this.
32bit -target
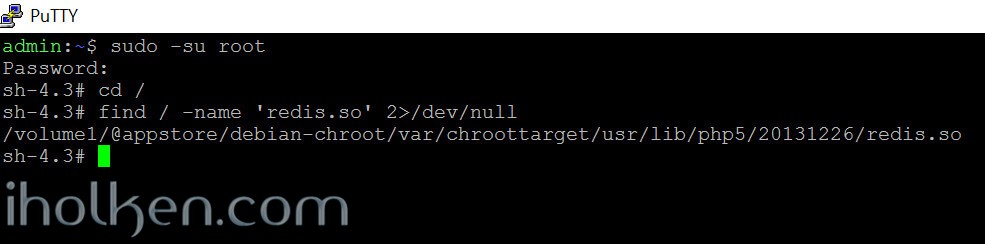
Step 1 – Find Debian chroot installed ‘redis.so’ module:
1 2 |
find / -name 'redis.so' 2>/dev/null /volume1/@appstore/debian-chroot/var/chroottarget/usr/lib/php5/20131226/redis.so |
Terminal output:
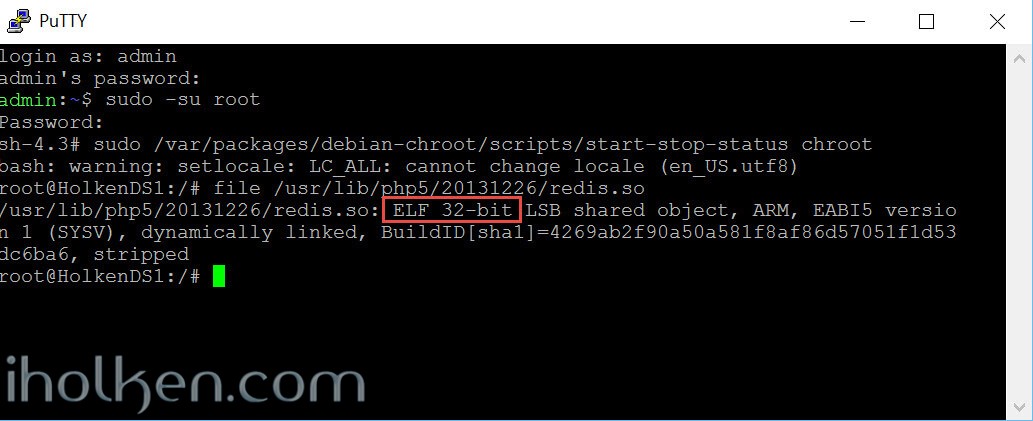
Step 2 – Check compiled file redis.so settings – should be 32bit for 32bit target. You should do this in Debian chroot terminal:
1 2 3 |
sudo /var/packages/debian-chroot/scripts/start-stop-status chroot file /usr/lib/php5/20131226/redis.so |
Output should be something like this:
Step 3 – Exit from Debian chroot terminal and take the file location from the first query and copy the required ‘redis.so’ module to following 2 locations and chmod permissions accordingly:
1 2 3 4 5 |
cp /volume1/@appstore/debian-chroot/var/chroottarget/usr/lib/php5/20131226/redis.so /usr/local/lib/php56/modules/redis.so chmod 755 /usr/local/lib/php56/modules/redis.so cp /volume1/@appstore/debian-chroot/var/chroottarget/usr/lib/php5/20131226/redis.so /usr/lib/php/modules/redis.so chmod 755 /usr/lib/php/modules/redis.so |
64bit -target
For 64bit systems you need to download the phpredis and compile it manually for 64bit target. You are doing these in Debian chroot terminal.
Step 1 – Install zip and gcc-multilib, load phpredis.zip from GIT and compile it to 64bit target.
1 2 3 4 5 6 7 8 |
sudo /var/packages/debian-chroot/scripts/start-stop-status chroot /usr/bin/apt-get install zip unzip /usr/bin/apt-get install gcc-multilib /usr/bin/wget --no-check-certificate https://github.com/phpredis/phpredis/archive/master.zip -O /tmp/phpredis_master.zip /usr/bin/unzip -o /tmp/phpredis_master.zip && mv /tmp/phpredis-* /tmp/phpredis && cd /tmp/phpredis && phpize && ./configure CC='gcc -m64' CXX='g++ -m64' && make && make install |
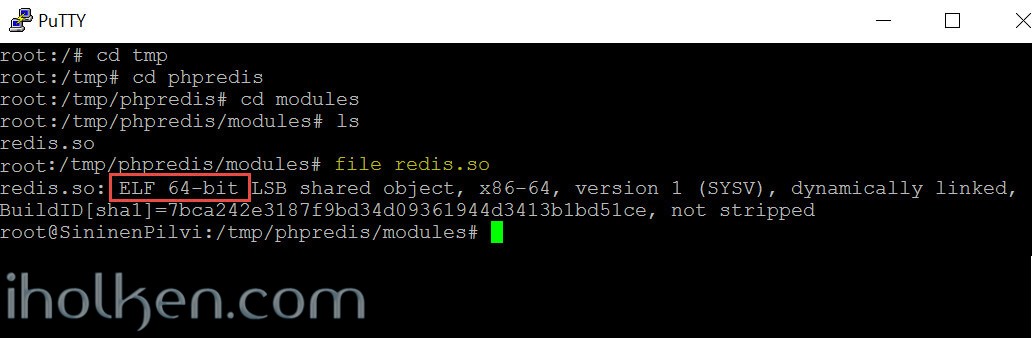
Now you should have generated 64bit redis.so file in the folder ‘/tmp/phpredis/modules/’
Step 2 – You can check the file settings for the generated redis.so, should be 64bit now:
Step 3 – Exit from Debian chroot terminal, find out redis.so file location in Debian chroot folder structure, and copy the required ‘redis.so’ module to following 2 locations and chmod permissions accordingly:
1 2 3 4 5 6 7 |
find / -name 'redis.so' cp /volume1/@appstore/debian-chroot/var/chroottarget/tmp/phpredis/modules/redis.so /usr/local/lib/php56/modules/redis.so chmod 755 /usr/local/lib/php56/modules/redis.so cp /volume1/@appstore/debian-chroot/var/chroottarget/tmp/phpredis/modules/redis.so /usr/lib/php/modules/redis.so chmod 755 /usr/lib/php/modules/redis.so |
Continue with general steps valid for 32 and 64 bit target systems.
Step 4 – Ensure phpredis for Apache/Web is started when Synology PHP is started:
1 |
sudo bash -c "echo extension=redis.so > /usr/local/etc/php56/conf.d/redis.ini" |
Doublecheck that path ‘/usr/local/etc/php56/conf.d/’ really now has ‘redis.ini’ file with content ‘extension=redis.so ‘.
Step 5 – Ensure that PHP CLI has also ‘redis.so’ php extension included, so that you can do testing in CLI.
First find out where exactly PHP CLI php.ini file is located, query is done in terminal – so you get PHP CLI result:
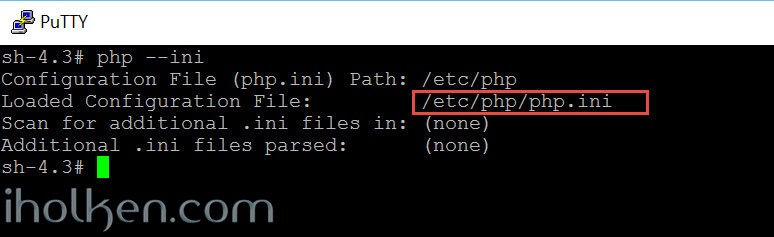
Then use NANO to edit PHP CLI php.ini and make sure that you have there the ‘extension=redis.so’ included:

So it should be clear to everyone that Apache PHP and CLI PHP have different php.ini files, and you can find the paths with above command for CLI and phpinfo() for the Apache PHP.
Step 6 – Restart your Synology NAS, or Restart your Web station, or change some PHP settings in Synology admin interface PHP settings section (ensures that PHP is re-started and new extensions loaded before proceeding to next step).
Step 6a – Now after the PHP module re-start you actually might also be able to find REDIS module also in your webstation and PHP settings in your Synology. Here you could now enable the REDIS module, at least it should not do any harm (although enabling it should not be mandatory in this configuration).
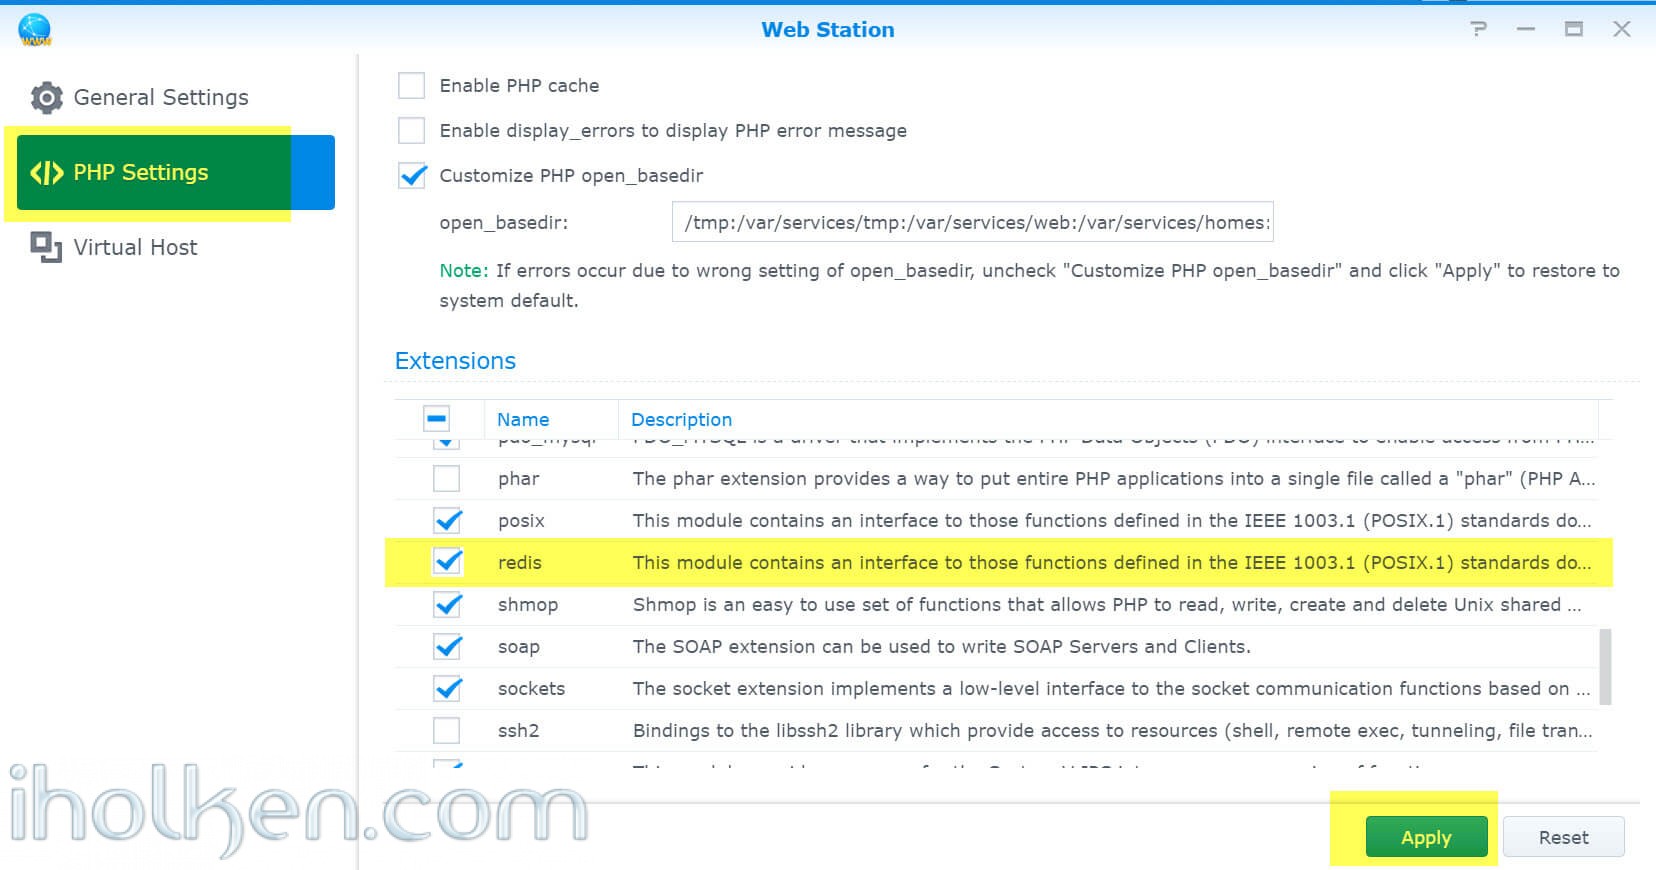
And few users have also indicated that this was needed for REDIS to work. I personally disagree with that comment, as I personally don’t have it enabled here in any of my Owncloud installations.
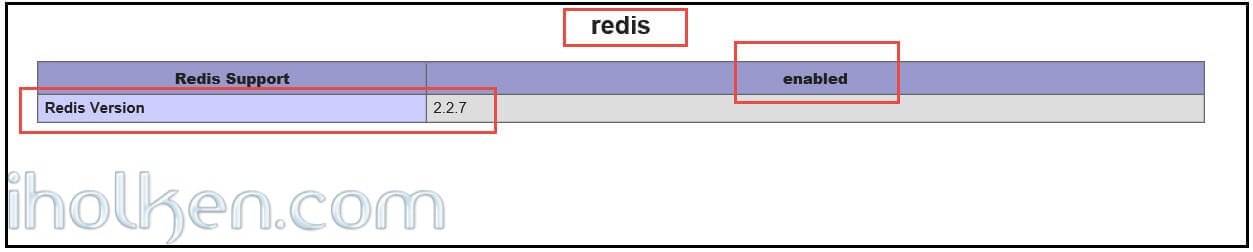
Step 7 – Doublecheck your Apache PHP config accessing phpinfo() through web page, hopefully you will now find redis module loaded and enabled.
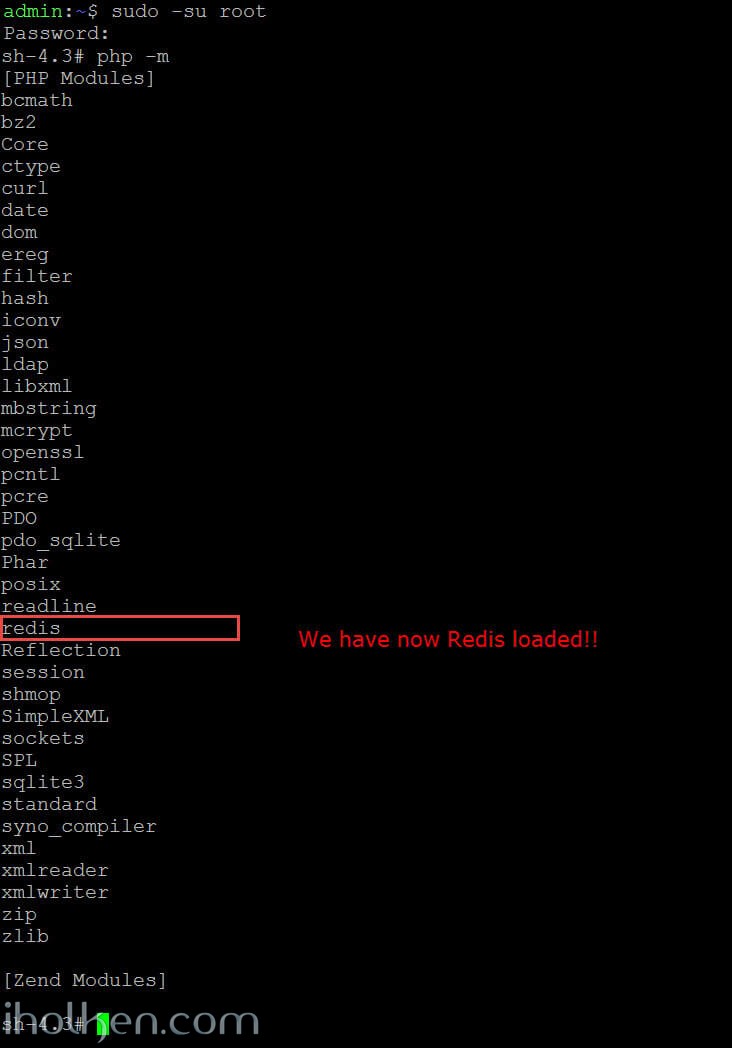
Step 8 – Check loaded PHP modules in terminal (uses CLI php.ini):
Step 9 – Test phpredis in action in Synology Terminal:
1 2 3 4 |
sh-4.3# php -r "if (new Redis() == true){ echo \"\r\n OK \r\n\"; }"

OK
sh-4.3#
|
And same example in SSH terminal:
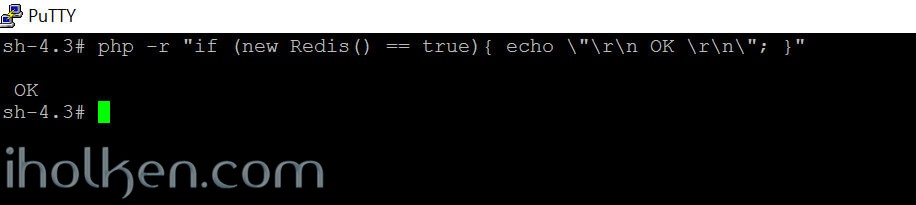
If you receive OK response – you can be pretty confident that you have now Redis-server and Redis PHP extension correctly installed and in use in your setup.
NOTE: If you do DSM update to your Synology – after update you need to check if the phpredis module is still loaded into Apache PHP or PHP CLI. Most probably it is not. If that is the case – you need to redo following steps:
- Re-copy the redis.so files to respective directories and assign permissions.
- Add ‘extension = redis.so’ to your PHP CLI -ini file.
- Re-start you PHP (restart webstation or change some php setting in your DSM UI)
This will enable phpredis again. It seems that Synology wants to overwrite few things on upgrades. 🙂
(Note: It is a good practice to take copies of such core files to somewhere outside system folders, that are manually installed into Synology Linux system folders – like in this case where we utilize Debian chroot installation procedure. As Synology has the tendency to overwrite and clear such files/folders on DSM upgrades, that are not delivered with the standard Synology OS. It makes the process for enabling these again a lot easier. You could actually even create the .sh scripts for copy/paste and permissions work – that would make it super easy.)
Final Step – Owncloud config
(NOTE: Please complete your Owncloud installation/setup fully, and test that it is working. Only then start modifying the config.php.)
Now you have successfully enabled Redis-server and Redis php extension in your Synology NAS – you can further enable Redis cache and Transactional File Locking for your Owncloud installation.
Please ensure that following lines can be found from your config.php file – in your Owncloud root config-folder, these will enable the usage of REDIS server through Owncloud for file locking purposes:
1 2 3 4 5 6 |
'filelocking.enabled' => 'true', 'memcache.locking' => '\\OC\\Memcache\\Redis', 'redis' => array( 'host' => 'localhost', 'port' => 6379, ), |
(Note: no duplicate ‘memcache.local’ or ‘memcache.locking’ rows should exist in your config.php. So use either REDIS or APCu for your local cache. Read more about this from Owncloud documentation.)
This is the config.php row, if you want/decide to use REDIS for local cache.
1 |
'memcache.local' => '\\OC\\Memcache\\Redis' |
Or alternatively, if you instead want to use APCu for your local cache, this is what you should have then in your config.php:
1 |
'memcache.local' => '\\OC\\Memcache\\APCu', |
Note: Highly recommended to read Owncloud documentation of different config.php parameters and cache configuration. And then decide and use the configuration that is valid for you.
All Done!
(If there is something wrong still in your CACHE config, you will get white blank page when trying to open Owncloud login page. If that happens, please check all the steps and checks made to ensure that everything is running properly.)
Also see my previous blog post about installing Owncloud 9 into Synology NAS.
Thanks – and please leave me a confirmation message below if this post helped you!!!!
(14.08.2016 – updated [apt-get] commands in chroot to use absolute paths, this will resolve the locale issue while executing commands in chroot)

Juha Ketola


Hi,
will this work on every Synology NAS or just on x86 based only ?
BR
Hi,
Debian chroot is running in 32bit mode by default, so the v1 guide above will output 32bit redis.so extension.
In order to make it to work in 64bit environment, you need to compile the redis.so to 64bit target, and use that one. I’ve done also the phpredis installation successfully to 64bit Synology NAS. Should I add to this guide the 64bit variant installation steps as well?
I won’t say it will work in every NAS, but I can say that it will work at least in some 32bit AND in some 64bit Synology NAS devices. 🙂
/Juha
Hi all!
Now I have added 32bit and 64bit target systems into this guide.
Please do let me know if you have tried to follow this guide. Very interested in results and which Synology NAS model you have.
Thanks to all in advance!
Dear Juha,
can you please explain this sentence: “Synocommunity is enabled into Synology as package source, and PHP has been already installed to Synology NAS (php-cli enabled)”.
What does “php-cli enabled” mean and how do I enable it? I have installed php 5.6 from the Package Center, but I don’t know to enable php-cli.
Thanks!
Hi,
In modern PHP versions CLI SAPI is on by default. PHP CLI in practice means PHP in Command Line Interface. Have you checked if it is enabled already?
Do this in NAS terminal:
****************************
admin:~$ php -v
PHP 5.6.11 (cli) (built: Mar 23 2016 12:11:13)
Copyright (c) 1997-2015 The PHP Group
Zend Engine v2.6.0, Copyright (c) 1998-2015 Zend Technologies
admin:~$
****************************
If the command is successful and you get (cli) in the response you should be fine. And you don’t need to worry that much about it.
/Juha
already enabled, thanks for the quick response!
Dear Juha,
thx for your howtos, but i have problem to implement the 64bit redis.so extension.
PHP Warning: PHP Startup: redis: Unable to initialize module
Module compiled with module API=20100525
PHP compiled with module API=20131226
These options need to match
in Unknown on line 0
PHP 5.6.11 (cli) (built: Mar 23 2016 12:24:40)
Hi,
Hmmm – I have not stumbled myself into that error in the Synology boxes I’ve dealt with. Have you installed manually some php version into your device at some point? Anyway – It may be that you need to ensure that your phpize command is using the version/config that you need.
Please find more hints for solving this from this thread:
Link
/Juha
Thx for the Link
Hi,
Exists the possibility to remove 64bit installation and install 32bits?
Thanks a lot.
Hi Joe,
So you have currently installed a 64bit php redis modules into a 64bit system?
And you would want to install 32bit modules?
Not sure I understand what you are after? As it would not work…… Could you open up why you would want to do that?
/Juha
Hi Juha,
I asked for it because I have a line error in log which says:
“PHP Startup: Unable to load dynamic library ‘/usr/lib/php/modules/redis.so’ – /usr/lib/php/modules/redis.so: wrong ELF class: ELFCLASS64 at Unknown#0”
I’ve found some problems while I was following the guide. I can’t find some paths, i.e:
I haven’t php56 installed (I have php5 instead) so I can’t execute some lines. I guess it is one of the problems. Basically, I have problems with the guide since php56 appears as path reference.
I have G8 using XPenology with Xeon E3 1220V2 which is x64 platform but I would like to try 32bits to test if exists any problem with the 64bits method.
Maybe you can help me with php56 problem, because I can’t find it to install without any method. I just find php or php5 packages.
Thanks a lot and sorry in advance for this long post.
Also, when I execute: ” php -r “if (new Redis() == true){ echo \”\r\n OK \r\n\”; }” “, it returns:
PHP Warning: PHP Startup: Unable to load dynamic library ‘/usr/lib/php/modules/redis.so’ – /usr/lib/php/modules/redis.so: wrong ELF class: ELFCLASS64 in Unknown on line 0
PHP Warning: PHP Startup: Unable to load dynamic library ‘/usr/lib/php/modules/redis.so’ – /usr/lib/php/modules/redis.so: wrong ELF class: ELFCLASS64 in Unknown on line 0
PHP Fatal error: Class ‘Redis’ not found in Command line code on line 1
Thanks for your excellent guides!
I’m stuck at Debian chroot, when doing:
sudo /var/packages/debian-chroot/scripts/start-stop-status chroot
I get:
bash: warning: setlocale: LC_ALL: cannot change locale (en_US.utf8)
And therfore the commands are not found, like:
apt-get update
All the links on the internet I found that supposed to have the fix for this are dead. Do you know how to fix this?
Thanks in advance.
Hello Dyon,
I had this problem too. But fortunately you can just use the absolute paths, like /usr/bin/apt-get.
Another option would be to modify the PATH variable of the debian-chroot-bash to include /usr/bin (and others eventually). You can get your current PATH variable by typing “echo $PATH” (without the quotation marks) at the command line.
Hope that helps!
Hi Kevin,
Thanks for this – great!!
I will actually update the guide for this part – to include absolute paths.
Appreciated – take care!!
/Juha
Thank you for this guide;
Just want to point out a more convenient way to get the right library (instead of through the debian chroot environment):
1/ Go to the packages of debian (at this moment: https://packages.debian.org/jessie/php5-redis)
2/ Download the correct package (for php5;not php7 + for correct infrastucture); eg. for 64bit: https://packages.debian.org/jessie/amd64/php5-redis/download
3/ Extract and copy the redis.so library to /usr/lib/php/modules
Hi, thank you for the excellent guide.
I just want to point out a more convenient way to get to the redis lib (no debian chroot or compilation required)
1/ Get the correct debian package (32 or 64 bit; for php 5). eg for 64 bit: https://packages.debian.org/jessie/amd64/php5-redis/download
2/ Extract package and copy redis.so to /usr/lib/php/modules
and then go forward with updating php.ini
Hi Hartwin,
Thanks for this – fully agree! For a user that is able to identify the correct architecture & package this is also a valid way forward.
Compiling from source always generates the right one, so I decided take that route for this. And partly as I’ve stumbled on many users not really sure on what they are having under the hood…
But summa summarum, the whole point is to show in this post, that enabling redis only requires copy-paste for couple files to right directories and adding few lines into PHP configuration. And that is usually enough for advanced users to see also easier paths – which is exactly what you also showcased here! 🙂
/Juha
Hello Juha,
just wanted to say thanks for your guide – works like a charm on my DS413j (ARM-based).
Thanks for the feedback Kevin!!!
Great to hear it worked out for you – take care!
/Juha
Hi Juha!
Many thanks for the excellent guide! It works well on another DS413j.
Hi Arnoud!
Great to hear – thanks for the confirmation and leaving a post.
Highly appreciated!
Take care!
/Juha
I want to install ownCloud. I start by setting a Redis server and php extension.
Installation encountered a problem. After entering the command: /usr/bin/unzip -o /tmp/phpredis_master.zip && mv /tmp/phpredis-* /tmp/phpredis && cd /tmp/phpredis && phpize && ./configure CC=’gcc -m64′ CXX=’g++ -m64′ && make && make install
Gives: mv: can not stat ‘/ tmp / phpredis- *’: No such file or directory
What could be the problem? Help me please. I am new to linux.
Hi,
You could try to use the absolute paths for every command in the script, in case your issue is that the commands cannot be found due to missing paths…..
Example:
– Instead of ‘apt-get’ you should use ‘/usr/bin/apt-get’
I hope this helps.
/Juha
Can you tell us at what stage should create folders: phpredis?
It is not and because of this error appears.
Hi,
The folder is created in this part of the command, when it is unzipped:
/usr/bin/unzip -o /tmp/phpredis_master.zip && mv /tmp/phpredis-* /tmp/phpredis && cd /tmp/phpredis
/Juha
Ok. I will look for a error
Quote from Kevin’s earlier comment regarding this:
“Another option would be to modify the PATH variable of the debian-chroot-bash to include /usr/bin (and others eventually).”
/Juha